Blog

  • Neutral tone Scandinavian kitchen decor A design guide

    Neutral tone Scandinavian kitchen decor A design guide

    The Scandinavian aesthetic, renowned for its minimalist elegance and functionality, finds a captivating expression in neutral-toned kitchens. This design approach leverages the interplay of light, texture, and natural materials to create spaces that are both serene and visually stimulating. The careful selection of color palettes, from creamy whites and soft greys to subtle earth tones, forms the foundation of this style, complemented by the strategic use of natural wood, stone, and metal.

    This exploration delves into the principles and practical applications of crafting a neutral Scandinavian kitchen, revealing the science behind the serene ambiance.

    We will examine how light interacts with these neutral hues, influencing the perceived warmth and coolness of the space. The role of texture, from the smooth polish of a stone countertop to the rustic grain of a wooden table, will be analyzed for its contribution to visual interest. Furthermore, we’ll explore the integration of minimalist decor and the subtle blending of modern and traditional Scandinavian elements to achieve a balanced and harmonious design.

    Defining “Neutral Tone” in Scandinavian Design

    Scandinavian design, renowned for its minimalist aesthetic and functionality, often utilizes a neutral color palette to create a sense of calm and spaciousness, particularly in kitchen settings. This approach leverages the principles of light, space, and natural materials to maximize the feeling of openness and serenity. The goal isn’t starkness, but rather a sophisticated simplicity that allows the inherent beauty of materials and light to shine through.

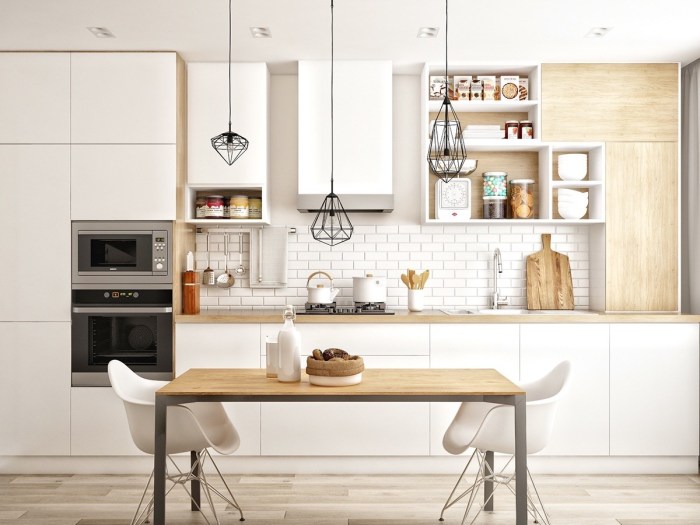
    Color palettes in neutral Scandinavian kitchens typically revolve around variations of white, beige, gray, and black. These are not pure, unadulterated hues, but rather nuanced shades that offer depth and visual interest. For instance, a warm, off-white like “Cloud White” might be paired with a cool, light gray such as “Silver Sand,” creating a subtle contrast that prevents monotony.

    The inclusion of a darker gray, perhaps a “charcoal” or “slate gray,” for accents like countertops or cabinet hardware, adds a touch of sophistication without overwhelming the space. Similarly, natural wood tones, ranging from light blonde to medium brown, provide warmth and texture that complements the cooler neutrals. The interplay of these shades, carefully balanced, defines the neutral tone within the Scandinavian aesthetic.

    The Influence of Lighting on Neutral Perception

    Lighting significantly impacts how neutral tones are perceived in a Scandinavian kitchen. Natural light, abundant in Scandinavian countries, is crucial. North-facing light, for instance, tends to be cooler and can enhance the coolness of grays and whites, while south-facing light, being warmer, can bring out warmer undertones in beiges and off-whites. Artificial lighting must complement this natural illumination.

    Soft, diffused lighting, such as from recessed downlights or pendant lights with opaque shades, prevents harsh shadows and maintains the overall sense of calm. In contrast, overly bright or focused lighting can alter the perception of neutral tones, potentially making them appear harsher or less harmonious. Careful consideration of both natural and artificial light sources is essential to maintaining the desired atmosphere of a neutral Scandinavian kitchen.

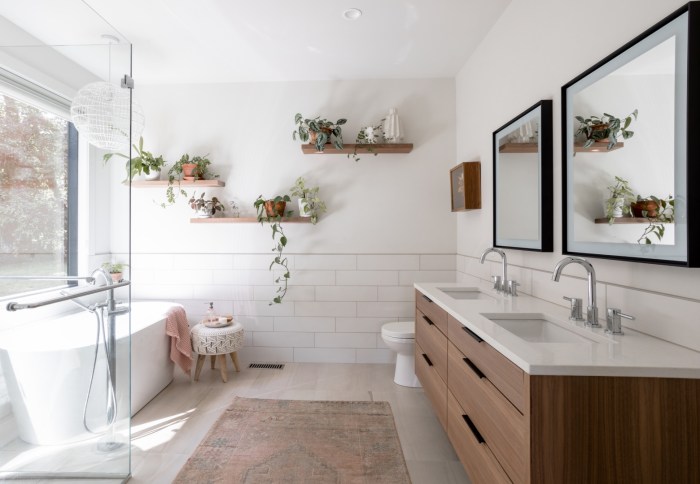
    The Role of Textures in Neutral Scandinavian Kitchens

    The use of texture is vital in preventing a neutral Scandinavian kitchen from appearing flat or sterile. Texture adds visual interest and depth, enhancing the overall aesthetic appeal without deviating from the neutral color scheme. Different textures create subtle contrasts that engage the eye and add layers of complexity to the space.

    Texture Material Example Color Suggestion Visual Impact Description
    Smooth Polished concrete countertops Light gray Creates a clean, modern, and sleek appearance; reflects light effectively.
    Rough Unpainted wood shelving Natural wood tone (blonde or medium brown) Adds warmth and rustic charm; provides a tactile contrast to smoother surfaces.
    Woven Rattan or linen chair seats Natural beige or off-white Introduces organic elements; adds visual interest and a sense of handcrafted quality.
    Textured Marble backsplash White with subtle gray veining Adds elegance and sophistication; subtle variations in color and texture create visual richness.

    Key Materials and Finishes

    The inherent beauty of a neutral Scandinavian kitchen lies in its masterful use of natural materials and understated finishes. The aesthetic prioritizes functionality and a sense of calm, achieved through careful selection of textures and tones that harmonize rather than compete. This approach allows natural light to play a key role in defining the space, enhancing the overall feeling of serenity.

    The choice of materials directly impacts the durability, maintenance, and longevity of the kitchen, making informed selection crucial.The selection of materials for a neutral Scandinavian kitchen centers around natural elements, reflecting a connection to nature and a minimalist approach. Woods, stones, and metals form the foundation of this design philosophy, each contributing unique textural and visual properties. Finishes, applied to these base materials, further modulate the light and contribute to the overall aesthetic impact.

    The interplay of these materials and finishes creates a cohesive and inviting atmosphere.

    Natural Material Selection

    Scandinavian design emphasizes the use of sustainably sourced and ethically produced materials. For countertops, durable and visually appealing options include soapstone, known for its resistance to heat and staining, and its unique veining patterns that subtly shift in tone depending on the light; granite, a hardwearing and heat-resistant igneous rock offering a variety of neutral colors from light greys to deep blacks; and marble, a metamorphic rock offering elegant veining and a luxurious feel, although it requires more maintenance due to its susceptibility to etching from acidic substances.

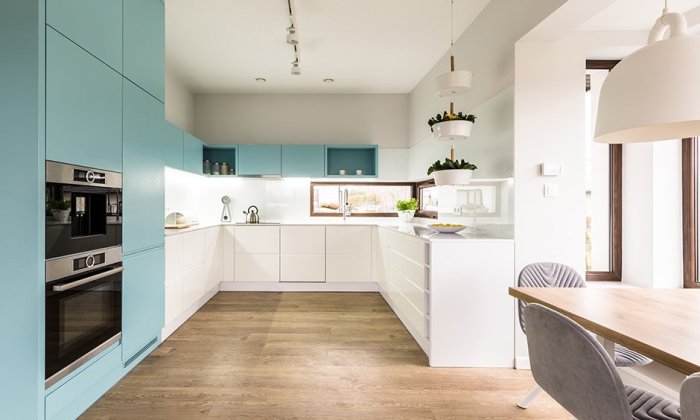
    Cabinetry often features light-colored woods such as oak, known for its strength and beautiful grain patterns, or ash, prized for its durability and subtle grain. Flooring frequently incorporates lighter wood species like pine or birch, their light tones reflecting light and increasing the perceived size of the space. Metal accents, often brushed stainless steel or matte black iron, add subtle industrial touches that contrast beautifully with the warmth of the wood and stone.

    Finish Application and Impact

    The choice of finish significantly alters the visual perception of the materials. Matte finishes, for example, diffuse light, creating a softer, more understated look. This is often preferred for cabinets and walls to avoid harsh reflections and maintain a sense of calm. Gloss finishes, on the other hand, reflect light, adding a sense of sophistication and drama, often used sparingly, perhaps on a single accent piece like a backsplash or a section of cabinetry.

    Brushed finishes, frequently seen on metal accents, create a subtle texture and a more muted appearance than polished metals, preventing glare and maintaining visual harmony. The strategic use of these finishes helps create visual interest and depth within the overall neutral palette.

    Countertop Design Options

    The countertop is a central feature in any kitchen, and its material and finish play a crucial role in defining the overall aesthetic. Below are three examples demonstrating the versatility of materials and finishes within a neutral Scandinavian design:

    • Option 1: A soapstone countertop with a matte finish. The subtle veining of the soapstone provides subtle visual interest, while the matte finish diffuses light, creating a calming and understated effect. The cool tones of the soapstone complement light-colored cabinetry and flooring, maintaining a cohesive neutral palette.
    • Option 2: A light grey granite countertop with a honed finish. The honed finish provides a subtle sheen without being overly glossy, offering a balance between practicality and visual appeal. The light grey granite complements various wood tones and metal accents, providing a neutral foundation for the kitchen.
    • Option 3: A white marble countertop with a polished finish. Used sparingly, perhaps as an island countertop, the polished marble provides a touch of luxury and visual interest with its elegant veining. The high-gloss finish reflects light, creating a sense of spaciousness and enhancing the overall aesthetic. This option requires careful consideration due to the marble’s susceptibility to staining and etching.

    Furniture and Fixtures

    Neutral tone Scandinavian kitchen decor

    The functionality and aesthetic of a Scandinavian kitchen are intrinsically linked to the careful selection of furniture and fixtures. These elements, characterized by simplicity, natural materials, and a focus on light and space, contribute significantly to the overall atmosphere of calm and understated elegance. The choice of materials and their finishes directly impact the perception of neutrality, a cornerstone of Scandinavian design.

    Scandinavian kitchen furniture prioritizes practicality and clean lines. The emphasis is on creating a space that is both beautiful and highly functional, reflecting a culture that values both form and utility. This is achieved through a combination of carefully chosen materials, minimalist designs, and a commitment to quality craftsmanship.

    Common Scandinavian Kitchen Furniture and Materials

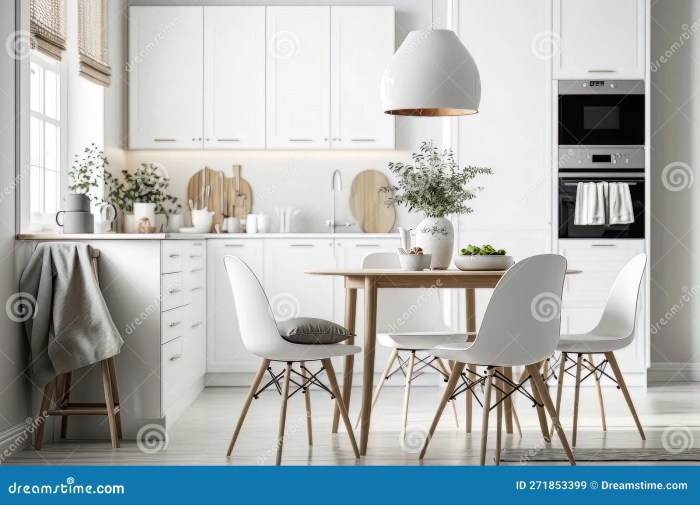
    The typical Scandinavian kitchen incorporates a range of furniture pieces, each designed to contribute to the overall sense of order and efficiency. Common items include simple, uncluttered dining tables often made from light-colored wood like birch or pine, offering a sense of spaciousness. Stools or chairs, frequently with light-colored wood frames and simple fabric upholstery in muted tones, are chosen to complement the tables.

    Open shelving, crafted from wood or metal, replaces bulky upper cabinets in many designs, allowing for the display of functional and decorative items. These pieces are typically characterized by their straightforward designs and use of natural, light-colored materials, further enhancing the overall brightness of the space. The integration of built-in appliances, seamlessly blending with the cabinetry, is also common, minimizing visual clutter.

    Neutral-Toned Cabinetry Styles and Hardware

    Neutral-toned cabinetry is paramount in achieving the desired Scandinavian aesthetic. Light-colored wood cabinets, such as those made from bleached oak or ash, offer a classic Scandinavian look, providing a warm, inviting feel without sacrificing the desired neutrality. Alternatively, matte white or light gray cabinets, often with a slightly textured finish to add depth, provide a clean, modern alternative.

    These colors create a backdrop that reflects light, making the kitchen appear larger and brighter. The choice of hardware is equally important. Brushed nickel, matte black, or even unlacquered brass fixtures offer subtle contrasts that maintain the neutral palette while adding a touch of visual interest. These finishes are chosen for their understated elegance and ability to complement the overall light and airy ambiance.

    Avoid overly ornate or brightly colored hardware; simplicity and subtle contrast are key.

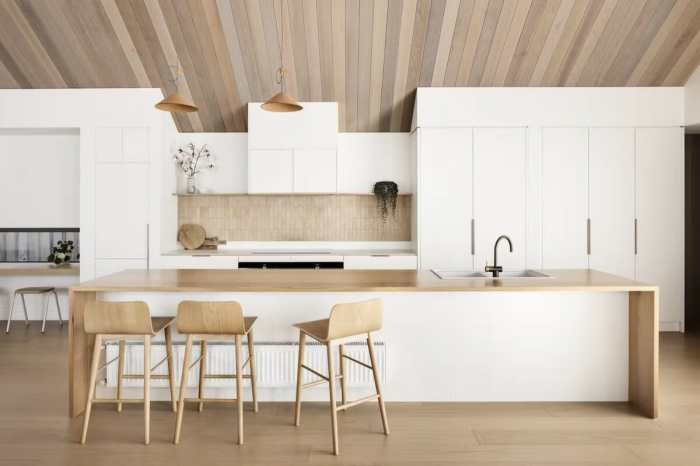
    Neutral Scandinavian Kitchen Island Design

    A central kitchen island serves as a focal point and functional hub in many Scandinavian kitchens. For a neutral design, consider a kitchen island measuring approximately 36 inches wide by 72 inches long and 36 inches high. The countertop could be constructed from a light-colored quartz or marble, such as Carrara marble, known for its subtle veining and light gray tones.

    This provides a durable and easy-to-maintain surface. The island’s base could be made from light oak or ash wood, matching the cabinetry, creating a cohesive look. Two simple, unfussy bar stools in a light-colored wood or a muted fabric would complement the island perfectly. Integrated storage, such as drawers and cabinets, could be incorporated into the island’s design, further enhancing its practicality.

    Under-counter lighting would add a soft glow, subtly highlighting the island’s features and enhancing the overall ambiance of the kitchen. The visual impact of such an island would be one of understated elegance and functional beauty, creating a central element that seamlessly integrates with the rest of the neutral Scandinavian kitchen design. The clean lines and natural materials would enhance the feeling of openness and calm, consistent with the overall design philosophy.

    Lighting and Ambiance

    Kitchen scandinavian designs white minimalist jaw unbelievable drop make will ideas look decor accents warm beautiful source

    The interplay of light and shadow is paramount in achieving the serene atmosphere characteristic of Scandinavian kitchen design. A well-lit Scandinavian kitchen, even with a neutral palette, avoids starkness and coldness by carefully layering different types of lighting to create depth and visual interest. This approach leverages the principles of human perception and the impact of light on mood and functionality.Different lighting types—ambient, task, and accent—collaboratively contribute to the overall ambiance.

    Ambient lighting provides general illumination, setting the overall mood. Task lighting focuses light on specific work areas, ensuring efficient and comfortable food preparation. Accent lighting highlights architectural features or decorative elements, adding visual interest and depth. The strategic combination of these three types creates a dynamic and inviting space, even within the constraints of a neutral color scheme.

    Ambient Lighting in Neutral Scandinavian Kitchens

    Ambient lighting forms the foundation of the kitchen’s illumination. In a neutral Scandinavian kitchen, this often involves recessed ceiling lights, providing even, diffused light that avoids harsh shadows. These fixtures, frequently chosen in minimalist designs, are often integrated into the ceiling, maintaining a clean and uncluttered aesthetic. Another option involves pendant lights, strategically positioned above an island or dining area.

    These pendants, typically featuring simple geometric shapes and matte finishes (like brushed nickel or black), add a touch of visual interest without detracting from the overall minimalist design. The selection of light bulbs is crucial; warm white (2700-3000K) LEDs are preferred for their soft, inviting glow, complementing the neutral tones and creating a welcoming atmosphere. Avoid cool white or daylight LEDs, which can make the space feel sterile and cold.

    Task Lighting for Enhanced Functionality

    Task lighting focuses light directly on work surfaces, minimizing eye strain and improving the efficiency of food preparation. Under-cabinet lighting, often utilizing LED strips, is a popular choice in Scandinavian kitchens. These lights are unobtrusive, tucked away beneath the cabinets, yet provide bright, focused illumination on countertops. Integrated task lighting within range hoods also contributes to effective workspace illumination.

    For islands, pendant lights positioned directly above the workspace, or strategically placed adjustable spotlights, ensure adequate illumination without visual clutter. The color temperature of task lighting can be slightly higher than ambient lighting, providing a clearer view of food preparation without feeling harsh.

    Accent Lighting to Highlight Architectural Details

    Accent lighting serves to emphasize specific features, adding depth and visual interest to the neutral palette. In a Scandinavian kitchen, this could involve strategically placed spotlights highlighting a unique backsplash tile pattern, a piece of art, or open shelving. These spotlights are usually adjustable, allowing for precise control of the light direction and intensity. The use of low-voltage halogen or LED spotlights ensures a soft, focused light, preventing glare and maintaining the calm atmosphere.

    Furthermore, the use of small, discreet LED strip lights within cabinets or along baseboards can create a subtle, ambient glow, enhancing the overall sense of warmth and sophistication without disrupting the minimalist aesthetic.

    Maximizing Natural Light in Scandinavian Kitchens

    Natural light is integral to Scandinavian design philosophy, enhancing the brightness and spaciousness of even a neutral-toned kitchen. Large windows, often extending from floor to ceiling, are common in Scandinavian homes. Their placement is strategically considered to maximize the inflow of sunlight throughout the day. For example, windows positioned on two adjacent walls can create a cross-breeze and provide abundant illumination even in deeper kitchen spaces.

    Window treatments should complement the natural light, rather than obstruct it. Sheer curtains or blinds made from natural materials like linen or bamboo allow diffused sunlight to filter through, while maintaining privacy. Avoid heavy, dark drapes that block sunlight and darken the space, counteracting the design’s goal of bright, airy atmosphere. The strategic use of mirrors strategically placed near windows can reflect and amplify the natural light, further brightening the kitchen and enhancing the feeling of spaciousness.

    Incorporating Minimalist Decor

    Neutral tone Scandinavian kitchen decor

    Minimalism, a design philosophy emphasizing simplicity and functionality, aligns seamlessly with the core tenets of Scandinavian design. Both prioritize clean lines, uncluttered spaces, and a focus on quality over quantity. Applying minimalist principles to a Scandinavian kitchen enhances its inherent sense of calm and spaciousness, creating an environment conducive to both relaxation and efficient task completion. The reduction of visual stimuli inherent in minimalism directly contributes to a feeling of serenity, a key objective in Scandinavian aesthetic.The application of minimalism in a Scandinavian kitchen involves a deliberate curation of items, prioritizing functionality and aesthetic harmony.

    This means selecting only those elements that serve a purpose and contribute positively to the overall design. Clutter is actively avoided, with every item carefully considered and strategically placed. The resulting space feels open and airy, even in smaller kitchens. This is achieved not through an absence of objects, but through a conscious selection of high-quality, purposeful items.

    Minimalist Decorative Elements for Neutral Scandinavian Kitchens

    A minimalist approach to decorating a neutral Scandinavian kitchen involves strategically incorporating a few carefully chosen elements that enhance the existing aesthetic without overwhelming the space. These elements should complement the neutral palette, often featuring shades of white, beige, and gray, while maintaining the clean lines and simplicity characteristic of the style. Over-decoration is avoided; instead, the focus is on quality and understated elegance.The principle of “less is more” guides the selection of decorative elements.

    For instance, a single, well-crafted ceramic vase containing a few sprigs of dried flowers can serve as a focal point, adding a touch of natural texture and warmth without disrupting the overall minimalist aesthetic. Similarly, a small collection of carefully chosen cookbooks displayed on an open shelf adds both functionality and visual interest. Avoidance of excessive patterns and bold colors ensures visual harmony.

    The goal is to create a space that feels serene and inviting, rather than cluttered and chaotic.

    Design of a Minimalist Display Shelf for a Scandinavian Kitchen

    A minimalist display shelf in a Scandinavian kitchen should be simple in design, likely made of light-colored wood or painted in a neutral shade. The shelf’s dimensions should be proportionate to the kitchen’s size, avoiding anything overly large or imposing. The placement of the shelf is crucial; it should not obstruct workflow or create a sense of crowding. A small, floating shelf above the counter, or a narrow shelf integrated into a wall unit, would be ideal.The items displayed on the shelf should be limited to a few carefully selected pieces that contribute to both functionality and visual harmony.

    The arrangement should be balanced and intentional, avoiding a haphazard or crowded look. The visual weight of the objects should be evenly distributed across the shelf. A key principle is to maintain negative space – the empty areas around the objects – as this contributes to the overall sense of spaciousness and calmness.The following items, strategically arranged, would create a visually appealing and functional display:

    • A small, ceramic bowl containing wooden spoons and spatulas. These are functional items that also add a touch of natural warmth.
    • A single, minimalist ceramic vase with a few dried flowers or branches. This adds a touch of natural texture and color without being overwhelming.
    • A stack of two or three cookbooks with neutral covers. These are functional and visually appealing, reflecting a love of cooking and simple elegance.
    • A small, decorative object, such as a smooth, grey stone or a simple, geometric ceramic sculpture. This adds a subtle artistic touch without disrupting the minimalist aesthetic.

    Blending Modern and Traditional Elements

    Neutral tone Scandinavian kitchen decor

    Scandinavian design, at its core, champions functionality and minimalism. However, a rigid adherence to modern aesthetics can sometimes feel sterile. The beauty of Scandinavian design lies in its adaptability; it gracefully accommodates both stark modern lines and the warmth of traditional craftsmanship, creating spaces that are both stylish and inviting. The key lies in thoughtful integration, balancing clean lines with subtle nods to heritage.The juxtaposition of modern and traditional Scandinavian elements offers a unique opportunity to create a kitchen that is both visually appealing and functionally efficient.

    Modern Scandinavian design often prioritizes streamlined forms, minimalist palettes, and industrial materials, while traditional Scandinavian design incorporates more ornate details, natural materials, and handcrafted elements. Harmoniously merging these styles requires a keen eye for detail and an understanding of how different materials and textures interact.

    Integrating Subtle Traditional Elements

    Successful integration hinges on choosing traditional elements judiciously. Overdoing it risks disrupting the overall minimalist aesthetic. The approach should be one of subtle accents rather than overt statements. For example, instead of a heavily carved wooden table, consider a simple, modern table with legs crafted from reclaimed wood, showcasing the natural grain and texture. This introduces a traditional element without overwhelming the modern design.

    Similarly, incorporating hand-woven textiles or vintage-inspired hardware can add character without sacrificing the clean lines of a modern Scandinavian kitchen.

    A Modern-Traditional Scandinavian Kitchen Design

    Consider a kitchen featuring sleek, handleless, white lacquered cabinets, a hallmark of modern Scandinavian design. These cabinets offer clean lines and ample storage. The flooring could be wide-plank, light oak – a natural material with a timeless appeal, representing a traditional touch. The oak’s natural grain adds warmth and visual interest without compromising the overall minimalist feel.

    The choice of light oak flooring offers a balance. Its natural variations in color and grain provide a subtle traditional counterpoint to the sleek modernity of the handleless cabinets.

    Appliances would be integrated seamlessly into the cabinetry, maintaining a streamlined appearance. However, a freestanding, enamelled cast iron stove, a nod to traditional Scandinavian cooking methods, could serve as a striking focal point. Its robust construction and vintage-inspired aesthetic provide a welcome contrast to the clean lines of the cabinetry.

    The freestanding enamelled cast iron stove introduces a bold traditional element while maintaining a practical functionality that aligns with the core principles of Scandinavian design. Its visual weight is balanced by the surrounding minimalist elements.

    The countertops could be made of a durable, light-colored quartz or composite material, echoing the minimalist aesthetic while offering practical functionality. A single, handcrafted wooden cutting board, placed strategically on the countertop, serves as a subtle yet effective traditional accent.

    The handcrafted wooden cutting board adds a touch of rustic charm, contrasting with the smooth, modern lines of the quartz countertop. Its natural texture and unique grain pattern provide a tactile element and visual interest.

    This design approach successfully blends modern and traditional elements. The sleek lines and minimalist palette of the modern elements provide a clean and uncluttered foundation, while the carefully chosen traditional accents add warmth, character, and a sense of history. The overall effect is a kitchen that is both stylish and inviting, reflecting the best of both worlds.

    Last Word

    Creating a neutral-toned Scandinavian kitchen is not merely about selecting a color palette; it’s about understanding the interplay of light, texture, and materiality to craft a space that is both aesthetically pleasing and functionally efficient. By carefully considering the principles of minimalism, maximizing natural light, and thoughtfully integrating modern and traditional elements, one can achieve a kitchen that is both calming and inspiring—a testament to the enduring appeal of Scandinavian design.

    The result is a space that transcends mere aesthetics, becoming a reflection of a mindful and balanced lifestyle, grounded in the principles of simplicity and functionality.

    Frequently Asked Questions

    What are some popular neutral paint colors for a Scandinavian kitchen?

    Soft whites (like “Swiss Coffee” or “White Dove”), light greys (“Agreeable Gray” or “Repose Gray”), and warm beige tones (“Pale Oak” or “Natural Linen”) are popular choices. The specific shade’s undertones (cool or warm) significantly impact the overall feel.

    How do I incorporate plants into a neutral Scandinavian kitchen without disrupting the minimalist aesthetic?

    Choose a few strategically placed, low-maintenance plants in simple, neutral pots. Consider a single, large statement plant or a small grouping of smaller plants, avoiding overcrowding. Vertical placement (hanging planters) can maximize space efficiency.

    What are some budget-friendly ways to achieve a Scandinavian kitchen look?

    Opt for affordable materials like light-colored laminate countertops instead of expensive stone. Repurpose existing furniture with a fresh coat of paint. DIY projects like open shelving can replace costly custom cabinetry. Focus on key elements – lighting and simple hardware can make a big impact.

    How can I ensure sufficient task lighting in a minimalist Scandinavian kitchen?

    Under-cabinet lighting is crucial for task illumination. Consider LED strip lights for a sleek, integrated look. A pendant light above an island provides both ambient and task lighting. Ensure adequate general ambient lighting to avoid harsh shadows.

    Are there any specific considerations for small Scandinavian kitchens?

    Maximize natural light with light-colored walls and minimal window treatments. Use mirrors strategically to create the illusion of more space. Choose light-colored, compact furniture and appliances. Opt for open shelving to avoid a cluttered feel.

  • White Scandinavian Kitchen Layout A Design Guide

    White Scandinavian Kitchen Layout A Design Guide

    Imagine a kitchen bathed in soft, natural light, where minimalist elegance meets functional design. This is the essence of the White Scandinavian kitchen, a space where clean lines, natural materials, and a calming color palette create a haven of serenity and practicality. We delve into the principles of Scandinavian design, exploring how they translate into efficient and aesthetically pleasing kitchen layouts.

    From the choice of materials to the strategic placement of lighting, we uncover the secrets to crafting a White Scandinavian kitchen that is both beautiful and highly functional.

    This exploration will cover various layout options, including galley, L-shaped, and U-shaped designs, examining their respective advantages and disadvantages within the context of Scandinavian aesthetics. We will meticulously detail material choices, lighting strategies, and appliance selection, emphasizing the importance of maximizing natural light and creating a harmonious flow. Furthermore, we’ll consider how to subtly personalize this minimalist style with carefully chosen décor and accessories, preventing any disruption of the overall sense of calm and order.

    Defining the “White Scandinavian Kitchen” Aesthetic

    The “White Scandinavian Kitchen” represents a synthesis of functionality, minimalism, and a connection to nature, hallmarks of Scandinavian design philosophy. This aesthetic transcends a simple color choice; it’s a holistic approach to kitchen design emphasizing light, space, and natural materials to create a calming and efficient environment. The resulting atmosphere is one of understated elegance and effortless practicality.The core principles of Scandinavian design—simplicity, functionality, and natural light—are paramount in this kitchen style.

    The emphasis is on clean lines, uncluttered surfaces, and a focus on quality over quantity. Natural materials like wood, stone, and textiles are incorporated to offset the starkness of the white palette and bring warmth and texture to the space. The overall effect aims for a feeling of spaciousness and serenity, a sanctuary within the home.

    Material Selection and Color Palettes

    White, naturally, dominates the color scheme, often used on walls, cabinetry, and countertops. However, this isn’t a stark, sterile white. Subtle variations, such as off-white, creamy white, or even a slightly grayed white, are frequently employed to add depth and visual interest. These variations prevent the space from feeling cold and clinical. The white serves as a backdrop to highlight natural wood tones in flooring, cabinetry accents, or shelving.

    Other common colors include muted pastels like light blues, greens, or grays, used sparingly as accent colors in textiles, tableware, or artwork. Black can also be incorporated, often in the form of sleek hardware or lighting fixtures, to create contrast and define specific areas. The use of natural materials like light oak or birch wood introduces warmth and texture.

    Stone, particularly light-colored stone like marble or quartz, might be incorporated into countertops, backsplashes, or flooring, further enhancing the natural aesthetic.

    Design Elements and Principles

    Open shelving is a common feature, displaying carefully curated tableware and kitchenware. This not only adds visual interest but also reinforces the minimalist ethos of showing only what is essential. Ample natural light is crucial; large windows and skylights are often incorporated to maximize daylight. If natural light is limited, artificial lighting is strategically placed to mimic natural light sources, avoiding harsh shadows and maintaining a bright, airy feel.

    Simple, functional cabinetry with clean lines and minimal hardware is preferred. Integrated appliances further contribute to the seamless, uncluttered look. A focus on functionality is key; every element has a purpose and contributes to the overall efficiency of the space. The overall impression is one of calm and order, a space designed for both functionality and relaxation.

    Variations within the White Scandinavian Kitchen Style

    The “White Scandinavian Kitchen” encompasses several interpretations, each with its own unique character. A minimalist version might feature predominantly white cabinetry, sleek countertops, and minimal décor. A rustic interpretation might incorporate more visible wood grain, reclaimed wood elements, and perhaps a distressed finish on some surfaces. A modern take might integrate high-tech appliances, sharp geometric lines, and possibly a bolder use of contrasting colors like black or deep gray.

    These variations allow for personalization while maintaining the core principles of the overall aesthetic. For example, a minimalist interpretation might prioritize a completely white space with a few carefully selected pieces of functional art. In contrast, a rustic version could incorporate a vintage-style wooden table and chairs, adding a sense of history and warmth. A modern interpretation might use a combination of matte and high-gloss surfaces, creating a sense of sophistication and sleekness.

    Layout and Functionality

    Norwegian interior scandinavian design kitchens nordic stylist style 2020 inspiring norway cozy stylish stunning most nordicdesign

    The design of a white Scandinavian kitchen hinges not only on aesthetics but also on the strategic arrangement of its elements to optimize workflow and maximize storage. Efficiency in a kitchen, a space often characterized by high-traffic and multiple simultaneous tasks, is paramount. Understanding the principles of kitchen ergonomics, including the “work triangle” (sink, stove, refrigerator), is crucial for achieving a functional and user-friendly space.

    This section will explore three common kitchen layouts within the Scandinavian aesthetic, analyzing their strengths and weaknesses.

    Galley Kitchen Layout

    The galley kitchen, characterized by its two parallel countertops, is particularly space-efficient, ideal for smaller Scandinavian homes or apartments. Its linear design promotes a streamlined workflow, reducing unnecessary movement between key appliances and work zones. However, limited counter space can be a drawback, especially in households with multiple cooks.

    Element Placement Dimensions Material
    Sink One end of one counter run 36″ x 22″ White composite granite
    Cooktop Opposite end of the other counter run 30″ x 20″ Stainless steel
    Refrigerator One side of one counter run, next to the sink 36″ wide x 68″ high x 24″ deep Stainless steel with white paneling
    Oven Under the cooktop 30″ wide x 30″ high x 24″ deep Stainless steel
    Cabinets Along both counter runs Variable, depending on space White matte lacquered wood

    L-Shaped Kitchen Layout

    The L-shaped kitchen offers a balance between space efficiency and functionality. The configuration creates a natural work triangle, improving workflow. The corner space can be optimized with clever storage solutions like corner cabinets or pull-out shelves. While generally more spacious than a galley kitchen, an L-shaped design can still feel cramped if not properly planned.

    Element Placement Dimensions Material
    Sink One leg of the “L”, near a window (if available) 36″ x 22″ White ceramic
    Cooktop Adjacent to the sink, on the same leg 36″ wide Induction cooktop, stainless steel
    Oven Below the cooktop 30″ wide x 30″ high x 24″ deep Stainless steel
    Refrigerator On the other leg of the “L” 36″ wide x 68″ high x 24″ deep Stainless steel with white paneling
    Cabinets Along both legs of the “L” Variable, depending on space White high-gloss laminate

    U-Shaped Kitchen Layout

    The U-shaped kitchen provides ample counter space and storage, ideal for larger families or those who enjoy cooking extensively. The three walls of cabinets and countertops create a highly functional work triangle and abundant storage options. However, this layout requires a significant amount of space and can feel overwhelming in smaller kitchens.

    Element Placement Dimensions Material
    Sink One leg of the “U” 48″ x 22″ double sink White composite quartz
    Dishwasher Next to the sink 24″ wide Stainless steel
    Cooktop Another leg of the “U” 36″ wide Gas cooktop, stainless steel
    Oven Below the cooktop 30″ wide x 30″ high x 24″ deep Stainless steel
    Refrigerator Third leg of the “U” 36″ wide x 68″ high x 24″ deep Stainless steel with white paneling
    Cabinets Along all three legs of the “U” Variable, depending on space White shaker style wood

    Comparison of Kitchen Layouts

    The choice between galley, L-shaped, and U-shaped layouts depends heavily on available space and cooking habits. Galley kitchens excel in space efficiency but lack counter space. L-shaped kitchens offer a good compromise, balancing space and functionality. U-shaped kitchens provide the most space and storage but demand a larger footprint. In a white Scandinavian context, all three layouts can achieve the desired aesthetic, but careful consideration of workflow and storage solutions is crucial for maximizing usability.

    Efficient Workflow and Storage Solutions

    Efficient workflow in a white Scandinavian kitchen is achieved through thoughtful placement of appliances and ample counter space to accommodate food preparation and cooking tasks. The “work triangle” concept, positioning the sink, stove, and refrigerator within close proximity, minimizes unnecessary movement. Studies have shown that optimized kitchen layouts can reduce preparation time and improve overall efficiency. Incorporating pull-out drawers, corner cabinets, and vertical storage solutions maximizes storage capacity within the often-limited space of Scandinavian homes, keeping the clean, minimalist aesthetic intact.

    The use of light-colored materials and ample lighting further enhances the sense of spaciousness and functionality.

    Materials and Finishes

    The selection of materials and finishes is paramount in achieving the characteristic aesthetic of a white Scandinavian kitchen. The interplay of textures and the careful choice of materials contribute significantly to the overall feeling of light, airy spaciousness and understated elegance. This section details the typical materials used, their properties, and how they are combined to create a harmonious and functional space.The inherent simplicity of Scandinavian design relies on high-quality, natural materials that age gracefully.

    The focus is on functionality and durability, with an emphasis on creating a space that is both beautiful and practical for everyday use.

    Material Selection and Properties

    The core materials used in white Scandinavian kitchens often include light-colored wood, natural stone, and brushed metals. These materials possess inherent properties that contribute to both the visual appeal and the practical functionality of the space. Light-colored wood, such as birch or ash, brings warmth and a tactile element, while its light tone maintains the bright and airy atmosphere.

    Natural stone, like marble or granite, offers durability and a sense of luxury, although its porous nature requires careful sealing and maintenance. Brushed metals, such as stainless steel or matte black, add a modern touch and contrast against the warmer tones of wood and stone, enhancing the overall visual interest.

    Material Combinations for Cohesive Design

    Combining materials thoughtfully is crucial for creating a visually appealing and cohesive space. For example, light-colored wood cabinetry can be paired with a marble countertop and stainless steel appliances. This combination balances warmth (wood), luxury (marble), and modern functionality (stainless steel). Alternatively, a white painted wood kitchen can incorporate black metal accents in the hardware and lighting fixtures, creating a stylish contrast against the bright background.

    The use of textured stone backsplashes further enhances the tactile appeal of the design. In another example, a combination of light oak wood flooring with white cabinetry and a light grey stone countertop creates a serene and minimalist aesthetic. The careful selection and arrangement of these materials prevent the space from feeling sterile, adding depth and character without sacrificing the overall sense of Scandinavian simplicity.

    Material Comparison Table

    Material Color Texture Use in Kitchen
    Birch Wood Light Brown/Beige Smooth, Grained Cabinets, Countertops (butcher block), Flooring
    Marble White, Grey, Black (veined) Smooth, Cool, Polished or Honed Countertops, Backsplashes
    Stainless Steel Silver Smooth, Metallic Appliances, Sinks, Hardware
    Matte Black Metal Black Smooth, Matte Hardware, Lighting Fixtures, Faucets

    Lighting and Ambiance

    The Scandinavian aesthetic, particularly in a white kitchen, relies heavily on the interplay of light and shadow to create a feeling of airy spaciousness and calm. Effective lighting design is not merely functional; it’s a crucial element in shaping the mood and overall experience of the space. The strategic use of various lighting types, combined with maximizing natural light, is key to achieving the desired ambiance.The inherent brightness of white surfaces amplifies the impact of light sources, making careful planning essential.

    Too much harsh light can wash out the space, while insufficient illumination can create a cold or uninviting atmosphere. A balanced approach, integrating ambient, task, and accent lighting, is necessary to achieve the warm, inviting, and functional Scandinavian kitchen.

    Ambient Lighting: Establishing the Base

    Ambient lighting provides the overall illumination of the kitchen, creating a foundation for other light sources. In a white Scandinavian kitchen, this is best achieved with soft, diffused light. Recessed ceiling lights, strategically placed to avoid harsh shadows, are ideal. These can be complemented by a large, centrally located pendant light, perhaps with a simple, minimalist design, offering a focal point and additional ambient light.

    The light color temperature should be warm white (around 2700-3000 Kelvin) to enhance the cozy feeling. Avoid overly bright or cool-toned light sources, as these can detract from the intended atmosphere.

    Task Lighting: Enhancing Functionality

    Task lighting focuses on specific areas where work is performed, such as the countertop, sink, and stovetop. Under-cabinet lighting is crucial for illuminating these areas, providing clear visibility for food preparation and cleaning. LED strip lights are an excellent choice, offering energy efficiency and customizable brightness. Additionally, adjustable pendant lights above the island or peninsula provide focused illumination for food preparation and dining.

    These should have a slightly higher color temperature (around 3500 Kelvin) for better visibility without being harsh.

    Accent Lighting: Adding Depth and Interest

    Accent lighting is used to highlight specific features or architectural details within the kitchen. In a white Scandinavian kitchen, this can be used to emphasize the texture of natural materials, such as wood or stone, or to draw attention to a particular piece of art or décor. Small, strategically placed spotlights or wall sconces can effectively achieve this. These lights should have a warm color temperature (around 2700 Kelvin) to create a welcoming and inviting atmosphere.

    Avoid using too many accent lights, as this can detract from the overall minimalist aesthetic.

    Maximizing Natural Light and its Complement

    Natural light is a cornerstone of the Scandinavian design philosophy. Large windows should be maximized to flood the kitchen with natural light, providing a bright and airy feel. Sheer curtains or blinds can be used to control the intensity of the sunlight and provide privacy while still allowing ample light to enter. Artificial lighting should complement the natural light, seamlessly integrating to provide sufficient illumination even during darker hours.

    Dimmers on the artificial light fixtures allow for adjustment based on the level of natural light available, ensuring a consistent and comfortable ambiance throughout the day.

    Appliances and Fixtures

    White Scandinavian kitchen layout

    The heart of any kitchen, Scandinavian or otherwise, lies in its appliances and fixtures. These elements not only perform essential functions but also significantly contribute to the overall aesthetic. In a white Scandinavian kitchen, the selection of appliances and fixtures is particularly crucial, as they must seamlessly integrate with the clean, minimalist design while maintaining high functionality. The emphasis is on understated elegance, durable materials, and intuitive operation.The selection process often prioritizes integrated or seamlessly concealed appliances to maintain a clean, uncluttered look, a key tenet of Scandinavian design.

    Functionality remains paramount, however; these kitchens are designed for both everyday use and entertaining, demanding appliances that are both stylish and highly efficient.

    Appliance Selection for a White Scandinavian Kitchen

    The choice of appliances directly impacts the visual harmony and operational efficiency of the kitchen. Stainless steel appliances, while popular, can sometimes clash with the overall lightness of a white Scandinavian scheme. Instead, consider appliances with matte white or muted metallic finishes that blend subtly into the background, allowing the overall design to take center stage. Many manufacturers now offer appliances specifically designed to complement modern minimalist aesthetics.

    Examples of Complementary Appliances and Fixtures

    A built-in refrigerator with a sleek, handleless design in white or a light grey seamlessly integrates into the cabinetry. An induction cooktop, often featuring a smooth, glass surface, contributes to the clean lines of the design. A concealed range hood, perhaps integrated into the cabinetry above the cooktop, maintains the uncluttered appearance. For ovens, models with clean lines and a minimalist control panel in brushed stainless steel or matte white provide a refined look.

    A dishwasher with a similar design aesthetic completes the integrated appliance suite. Fixtures such as a chrome or brushed nickel faucet, with its simple lines, perfectly complements the minimalist theme.

    Essential Appliances and Fixtures

    • Refrigerator: A built-in, handleless model in white or a light neutral color, prioritizing energy efficiency and ample storage space. The integrated design ensures a seamless look, maintaining the minimalist aesthetic. For example, a model from brands known for their minimalist design could be considered.
    • Cooktop: An induction cooktop with a sleek glass surface. Induction cooktops offer precise temperature control and faster heating times, enhancing both functionality and efficiency. The smooth surface contributes to easy cleaning and the overall minimalist look.
    • Oven: A built-in oven with a minimalist control panel, preferably in white or brushed stainless steel. Features like convection baking and self-cleaning capabilities add to the convenience and functionality. Consider models known for their quiet operation and energy efficiency.
    • Dishwasher: A fully integrated dishwasher with a similar design aesthetic to the other appliances. Quiet operation and efficient water usage are key considerations for a seamless user experience. Models with adjustable racks and flexible loading options are particularly useful.
    • Range Hood: A concealed range hood integrated into the cabinetry above the cooktop. This ensures that the ventilation system remains unobtrusive, preserving the clean lines of the design. High-efficiency models are preferred for minimizing noise and energy consumption.
    • Sink and Faucet: A simple, undermount sink in a durable material like composite granite or stainless steel, paired with a single-lever faucet in chrome or brushed nickel. The undermount design contributes to the clean lines and easy cleaning of the countertop.

    Decor and Accessories

    White Scandinavian kitchen layout

    The incorporation of decor and accessories in a white Scandinavian kitchen requires a delicate balance. The inherent minimalism of the style necessitates careful selection to avoid disrupting the clean lines and airy feel. The key is to introduce personality and warmth through thoughtfully chosen pieces that complement, rather than compete with, the existing aesthetic. Over-accessorizing can quickly negate the intended effect, transforming a serene space into a cluttered one.The goal is to leverage texture, color, and material to subtly enhance the existing design, creating visual interest without sacrificing the sense of calm and order that defines Scandinavian design.

    This is achieved through a restrained approach, focusing on quality over quantity, and prioritizing natural materials and neutral tones.

    Mood Board Description

    This mood board depicts a cohesive decor scheme for a white Scandinavian kitchen. The backdrop is the pristine white of the cabinetry and walls. The dominant texture is the smooth, matte finish of the cabinetry contrasted with the natural, slightly rough texture of a light oak butcher block countertop. Color is kept primarily neutral, with variations of white and off-white creating subtle depth.

    A few carefully chosen accents introduce warmth: a muted terracotta-colored vase holding dried pampas grass, a woven linen runner on the countertop, and a collection of small, hand-thrown ceramic bowls in earthy tones. Materials include natural wood (oak), linen, ceramic, and possibly a touch of brushed brass in the hardware. The overall feeling is one of understated elegance, reflecting a sense of quiet sophistication and calm.

    Examples of Decorative Elements

    Plants, textiles, and artwork are effective ways to personalize a white Scandinavian kitchen without sacrificing its minimalist aesthetic. The selection of these elements should follow the same principles of restraint and harmony as the overall design.Plants, for example, should be chosen for their simple elegance and ability to bring life into the space. A single, large fiddle-leaf fig in a simple ceramic pot or a small grouping of succulents in minimalist planters can add a touch of nature without cluttering the counter space.

    Avoid overly ornate or brightly colored planters; simple, neutral-toned pots are ideal.Textiles, such as linen dish towels, a simple runner, or a small, woven placemat, can introduce texture and warmth. These textiles should be in natural colors and materials, complementing the existing color palette and enhancing the overall tactile experience of the kitchen. Avoid busy patterns or overly saturated colors.Artwork should be minimalist and understated.

    A single, framed print featuring a nature scene, a simple abstract piece, or a piece of minimalist photography can add a touch of personality without overwhelming the space. Frame materials should be kept simple; natural wood or a sleek, matte black frame would be suitable. The artwork should complement the overall color scheme and texture of the space, avoiding jarring contrasts or overly bold statements.

    Wrap-Up

    White Scandinavian kitchen layout

    The White Scandinavian kitchen, ultimately, is more than just a space for preparing food; it’s a reflection of a design philosophy that prioritizes functionality, simplicity, and connection with nature. By thoughtfully considering layout, materials, lighting, and décor, one can create a kitchen that is not only visually stunning but also a joy to use. The principles of Scandinavian design, with their emphasis on light, space, and natural materials, offer a timeless and adaptable framework for creating a kitchen that will remain both stylish and practical for years to come.

    The key lies in achieving a balance – a sophisticated simplicity that reflects a modern lifestyle while embracing the warmth and inviting atmosphere of traditional Scandinavian design.

    FAQ Overview

    What are some alternative color palettes for a White Scandinavian kitchen?

    While white is dominant, consider subtle grays, muted blues, or soft greens as accent colors. These complement the natural wood tones and create visual interest without overwhelming the minimalist aesthetic.

    How can I incorporate sustainable practices into my White Scandinavian kitchen design?

    Choose sustainably sourced wood, recycled materials, and energy-efficient appliances. Opt for low-VOC paints and finishes to minimize environmental impact. Consider using reclaimed wood for countertops or shelving.

    What are some cost-effective ways to achieve a White Scandinavian kitchen look?

    Focus on affordable materials like IKEA cabinetry painted white, and utilize cost-effective lighting solutions like LED strip lighting. Prioritize functionality over high-end appliances initially, upgrading as budget allows. DIY projects, like painting existing cabinets, can also save money.

    How do I prevent a white Scandinavian kitchen from feeling sterile?

    Introduce natural textures through wood, stone, and textiles. Incorporate plants for a touch of life and warmth. Add carefully selected artwork or decorative objects to personalize the space without cluttering it.

    What type of flooring is best suited for a White Scandinavian kitchen?

    Light-colored wood flooring, or large-format light-colored tiles, are excellent choices. These materials create a sense of spaciousness and complement the overall aesthetic. Consider durability and ease of maintenance when making your selection.

  • Unfinished Bathroom with Open Shelves A Design Guide

    Unfinished Bathroom with Open Shelves A Design Guide

    The unfinished bathroom, a space often perceived as a chaotic void, presents a unique design challenge. However, the strategic incorporation of open shelving transforms this raw environment into a functional and aesthetically pleasing area. This exploration delves into the practical and aesthetic considerations of designing, installing, and maintaining open shelving in an unfinished bathroom, addressing material choices, installation techniques, organizational strategies, and the mitigation of potential problems associated with high humidity and dust.

    From selecting durable and water-resistant materials like reclaimed wood or epoxy-coated metal to mastering secure installation methods on uneven surfaces, we’ll navigate the intricacies of creating a beautiful and functional space. We’ll examine various styling approaches, from rustic charm to minimalist elegance, offering practical solutions for organizing toiletries and decorative elements. The journey will also encompass preventative measures against mold and moisture damage, ensuring the longevity and appeal of your open shelving system.

    Design Considerations for Open Shelving in an Unfinished Bathroom

    Bathroom design ideas open tidy shelf hgtv shelves keep talkdecor laundry room crafty put action planning inc vanity stylish into

    Open shelving in an unfinished bathroom presents a unique design challenge. The lack of complete finishing, such as full tiling or painted walls, necessitates careful consideration of material choices and storage solutions to create a visually appealing and functional space. The raw aesthetic of an unfinished bathroom can be enhanced or compromised depending on the shelving design. This section will explore the optimal approach to integrating open shelving into such an environment.

    Material Selection for Bathroom Shelving

    The choice of shelving material significantly impacts the overall look and longevity of the shelving unit in a potentially damp environment. Reclaimed wood, metal, and concrete are all viable options, each possessing distinct advantages and disadvantages. Reclaimed wood offers a rustic charm, but requires careful treatment to withstand moisture. Metal shelving, particularly stainless steel or powder-coated options, provides excellent durability and water resistance.

    Concrete, while visually striking and durable, requires a sealant to prevent water damage and staining.

    Comparison of Shelving Materials

    The following table compares the three materials across key criteria:

    Material Water Resistance Durability Aesthetic Appeal
    Reclaimed Wood (treated) Moderate (with sealant) Good (depending on wood type and treatment) Rustic, warm
    Stainless Steel Excellent Excellent Modern, sleek
    Concrete (sealed) Good (with sealant) Excellent Industrial, contemporary

    Creative Storage Solutions for Open Shelving

    Effective storage is crucial for maximizing space and minimizing clutter on open shelves. The unfinished nature of the bathroom might necessitate more creative solutions than a fully finished one. Here are five approaches:

    Implementing effective storage strategies is critical for maintaining a clean and organized look, especially in an unfinished bathroom where the open shelving becomes a prominent feature. Clutter can easily detract from the overall aesthetic, making strategic storage choices essential.

    • Stackable containers: Using clear, stackable containers allows for easy visibility and organization of toiletries and other items.
    • Floating shelves within shelves: Adding smaller floating shelves to the main shelving unit creates additional storage space and visual interest.
    • Wall-mounted baskets: Woven baskets attached to the wall beside the shelves provide extra storage for towels or other items.
    • Repurposed jars and containers: Glass jars and attractive containers can be used to store cotton balls, Q-tips, and other small items, adding a decorative touch.
    • Ladder shelving: A leaning ladder can serve as a unique and space-saving shelving unit, perfect for towels or rolled-up bathrobes.

    Importance of Lighting for Open Shelving

    Lighting plays a vital role in showcasing the items stored on open shelves, especially in an unfinished bathroom which might lack ambient lighting. Adequate lighting prevents the shelves from appearing dark and cluttered. Consider using a combination of ambient, task, and accent lighting. Ambient lighting provides general illumination, task lighting highlights specific areas on the shelves, and accent lighting can draw attention to particular items or textures.

    For instance, installing LED strip lights under the shelves can create a dramatic effect and highlight the textures of the stored items and the shelving material itself. This is especially important in an unfinished bathroom where the walls might not provide much reflective surface.

    Practical Aspects of Open Shelving in an Unfinished Space

    Installing open shelving in an unfinished bathroom presents unique challenges compared to a finished space. The lack of consistent wall surfaces, potential for uneven studs, and absence of readily available electrical outlets require careful planning and execution to ensure both safety and stability. This section details the practical considerations and methods for successful installation in such an environment.

    Challenges in Unfinished Bathroom Environments

    Unfinished bathrooms often exhibit irregularities that complicate shelving installation. Uneven walls, common in newly constructed or renovated spaces, necessitate precise measurements and potentially custom solutions to ensure the shelves sit level and securely. The absence of properly placed electrical outlets can hinder the installation of illuminated shelves or other power-dependent accessories. Furthermore, the presence of exposed plumbing, wiring, or insulation requires careful consideration to avoid damage and maintain building codes.

    Improper installation in these circumstances can lead to instability, shelving failure, and potential injury.

    Necessary Tools and Materials

    Safe and effective open shelving installation in an unfinished space demands specific tools and materials. These include a stud finder to locate wall studs for secure mounting, a level to ensure horizontal placement, a measuring tape for accurate dimensions, a pencil for marking, a drill with appropriate drill bits for the chosen fasteners, a screwdriver (or drill with screwdriver bits), wall anchors suitable for the wall material (e.g., drywall anchors, concrete anchors), shelving brackets (size and material depending on the shelf weight and wall type), the shelving material itself (wood, metal, etc.), safety glasses, and work gloves.

    Additional tools, such as a jigsaw or circular saw, might be needed depending on the shelving material and desired customizations.

    Securing Open Shelving to Different Wall Materials

    Three common methods exist for securely mounting open shelving to different wall materials typically encountered in unfinished bathrooms.

    Method 1: Securing to Wood Studs

    This is the most robust method. Wood studs provide excellent support. Use wood screws of appropriate length and diameter to directly attach the shelving brackets to the studs. Pre-drilling pilot holes prevents wood splitting and ensures a clean installation. This method is ideal for heavier shelves.

    Method 2: Using Wall Anchors in Drywall

    Drywall is a common wall material in unfinished spaces. Since drywall offers less support than studs, wall anchors are crucial. Select anchors rated for the weight of the shelves. Drill pilot holes according to the anchor’s instructions. Insert the anchors firmly into the drywall, then attach the brackets using the appropriate screws.

    This method is suitable for lighter shelves. Different types of anchors exist for various drywall thicknesses and load capacities. Examples include plastic expansion anchors and toggle bolts for heavier loads.

    Method 3: Securing to Concrete

    Concrete walls require specialized anchors designed for concrete. Concrete anchors, such as masonry anchors or wedge anchors, provide a strong hold. Use a hammer drill to create pilot holes of the correct size and depth. Insert the anchors firmly, and then attach the brackets using the appropriate screws. This method is suitable for all shelf weights but requires specialized tools and anchors.

    Incorrect drilling can damage the concrete.

    Step-by-Step Installation Guide

    Prior to beginning any work, ensure the area is well-lit and clear of obstructions. Always wear safety glasses and work gloves.

    1. Planning and Measurement: Measure the desired shelf locations and determine the number and size of shelves needed. Locate wall studs using a stud finder.
    2. Marking and Pre-Drilling: Mark the locations for the brackets on the wall. Pre-drill pilot holes in the wall to prevent cracking and damage, particularly important when working with drywall or concrete.
    3. Bracket Installation: Attach the brackets securely to the wall using the appropriate method (wood screws for studs, wall anchors for drywall, or concrete anchors for concrete walls). Ensure the brackets are level using a level.
    4. Shelf Placement: Carefully place the shelves onto the brackets, ensuring they are securely resting and level.
    5. Inspection and Adjustment: Inspect the installation to ensure all shelves are securely mounted and level. Make adjustments as needed.

    Styling and Organization of Open Shelving

    Construction under bathroom empty shower stock

    Open shelving in an unfinished bathroom presents a unique opportunity to blend functionality with aesthetic appeal. The raw, often industrial, nature of an unfinished space provides a blank canvas for various design styles, from rustic charm to sleek minimalism. Careful consideration of styling and organization is crucial to prevent the shelves from appearing cluttered and to maximize their utility.

    Mood Board: Three Styling Approaches for Open Shelving

    The following descriptions illustrate three distinct approaches to styling open shelving in an unfinished bathroom, each offering a unique aesthetic and functionality.

    • Rustic Charm: Imagine reclaimed wood shelves, their natural grain and imperfections visible, against a backdrop of exposed brick or concrete. The color palette leans towards warm earth tones – browns, creams, and muted greens. Accessories include vintage apothecary jars, woven baskets, and rough-hewn wooden boxes, containing cotton balls, bath salts, and towels. The overall effect is cozy and inviting, reminiscent of a quaint countryside retreat.

      This style embraces imperfection, celebrating the natural beauty of materials.

    • Modern Minimalism: This approach prioritizes clean lines and a streamlined aesthetic. Sleek, floating shelves made of white or light-grey materials contrast sharply with the unfinished walls. Storage containers are uniform in shape and size, often transparent or white, allowing contents to be easily visible. The color palette is limited, usually focusing on neutrals like white, grey, and black. A few carefully chosen decorative items, perhaps a single sculptural piece or a small potted succulent, add subtle visual interest.

      The focus is on functionality and simplicity.

    • Industrial Chic: This style incorporates the unfinished bathroom’s raw elements into the design. Metal shelving, perhaps with a black powder-coated finish, adds a touch of industrial edge. Storage containers are a mix of metal and glass, reflecting the raw aesthetic. The color palette includes greys, blacks, and metallic accents. Decorative items might include vintage industrial-style lighting fixtures or repurposed metal containers.

      The overall effect is sophisticated and edgy, blending industrial elements with a touch of modern refinement.

    Organizing Bathroom Essentials on Open Shelves

    Effective organization is essential to maintaining a visually appealing and functional open shelving system. A well-planned system maximizes space and ensures easy access to frequently used items.

    • Vertical Stacking: Taller items, like bottles of shampoo and conditioner, are placed at the back of the shelves, while smaller items are positioned towards the front. This creates visual balance and prevents items from being hidden.
    • Categorization: Group similar items together. For example, all skincare products could be placed on one shelf, while toiletries are on another. This makes finding specific items easier.
    • Color Coordination: While not strictly necessary, arranging items by color can enhance the visual appeal of the shelves. This creates a sense of order and harmony.

    Decorative Items for Open Shelving in an Unfinished Bathroom

    Decorative items should complement the overall aesthetic and enhance the space without being overly fragile or delicate.

    • Succulents and Air Plants: These low-maintenance plants add a touch of greenery and life to the space, thriving in a variety of light conditions. Their hardiness makes them suitable for even the most unconventional environments.
    • Textured Baskets: Woven baskets of natural materials, such as seagrass or rattan, provide storage and add a touch of rustic charm or modern texture depending on the style.
    • Stone or Ceramic Soap Dishes: These durable and visually appealing items add functionality and a touch of natural beauty.
    • Industrial-Style Metal Canisters: These can hold cotton balls, Q-tips, or other small bathroom essentials, adding a touch of industrial chic to the space. Their robustness ensures they can withstand daily use.

    Utilizing Baskets, Jars, and Containers for Organization

    Containers are key to maintaining a tidy and visually appealing open shelving system.

    • Uniformity: Using containers of similar size, shape, and material creates a cohesive and visually pleasing look. This is especially important in minimalist or modern styles.
    • Transparency: Clear glass or acrylic containers allow the contents to be easily visible, making it easy to locate items.
    • Labeling: For a more organized approach, labeling containers can further enhance functionality, especially in larger households.

    Addressing Potential Issues with Open Shelving in an Unfinished Bathroom

    Unfinished bathroom with open shelves

    Open shelving in a bathroom, particularly one that is unfinished, presents unique challenges due to the inherent high-humidity environment. Understanding these potential issues and implementing preventative measures is crucial for maintaining the longevity of both the shelving and the stored items. Ignoring these factors can lead to significant problems and unnecessary expenses down the line.

    Moisture Damage and Mold Growth

    High humidity levels in an unfinished bathroom create an ideal breeding ground for mold and mildew. These fungi thrive in damp conditions and can quickly colonize porous materials like wood, paper, and even some textiles. The lack of a sealed environment in an unfinished bathroom exacerbates this issue, allowing moisture to penetrate more easily. Mold growth not only damages stored items but also poses significant health risks, triggering respiratory problems and allergies.

    To mitigate this, proper ventilation is paramount. Exhaust fans should be installed and used regularly to reduce humidity. Consider using a dehumidifier, especially in particularly humid climates or during periods of high moisture. Shelving materials should be chosen for their moisture resistance; waterproof or water-resistant materials like treated wood, metal, or glass are preferable. Regular cleaning with a mild bleach solution (following manufacturer’s instructions carefully) can help prevent mold growth.

    Stored items should be kept dry and elevated off the shelves to improve airflow.

    Dust Accumulation and Item Protection

    Unfinished bathrooms often lack the airtight seals and finishes of completed spaces, leading to increased dust accumulation. This dust can settle on stored items, potentially causing damage or discoloration, especially on delicate items like toiletries or cosmetics. Furthermore, dust can act as a breeding ground for mites and other allergens. To address this, regular dusting is crucial. The use of airtight containers for storing items helps protect them from both dust and moisture.

    Consider using shelf liners to make cleaning easier and to create a barrier against dust. A strategically placed air purifier can also help reduce airborne dust particles.

    Open Shelving versus Closed Cabinetry: A Comparison

    Open shelving offers aesthetic advantages, creating a visually open and airy feel. However, in an unfinished bathroom, the lack of enclosure exposes stored items to moisture, dust, and temperature fluctuations. Closed cabinetry, while potentially less aesthetically pleasing, provides a significant level of protection against these environmental factors. Closed cabinetry also offers better organization and concealment of items. The choice depends on priorities; prioritizing aesthetics and ease of access may favor open shelving, while prioritizing protection and organization may lean towards closed cabinetry.

    A hybrid approach, combining open and closed storage solutions, could offer a compromise.

    Protecting Stored Items from Moisture and Dust

    Several strategies effectively protect stored items from moisture and dust in an unfinished bathroom. Airtight containers are crucial for sensitive items. Silicone-sealed containers are especially effective against moisture. Items susceptible to moisture damage, such as towels and bath mats, should be thoroughly dried before storage. Regularly rotating items ensures even exposure to air and prevents the build-up of moisture.

    Using moisture-absorbing packets (desiccants) within storage containers can further reduce moisture levels. Consider placing items on raised shelves or platforms to improve airflow and prevent direct contact with moisture that may accumulate on lower surfaces.

    Maintaining Clean and Organized Open Shelving

    Preventative maintenance is key to keeping open shelving clean and organized. Regular dusting (at least weekly) prevents dust build-up. A quick wipe-down with a damp cloth after each use of the bathroom helps remove any splashes or spills. Decluttering regularly prevents overcrowding and ensures good airflow. Using shelf dividers can help organize items and prevent them from shifting or falling.

    Finally, periodically deep clean the shelves with a suitable cleaner, paying close attention to corners and crevices where mold or mildew may accumulate.

    Closing Notes

    Unfinished bathroom with open shelves

    Ultimately, the success of open shelving in an unfinished bathroom hinges on a thoughtful integration of design, practicality, and maintenance. By carefully considering material selection, installation techniques, organizational strategies, and preventative measures against moisture damage, homeowners can create a functional and visually appealing bathroom that transcends the limitations of its unfinished state. The open shelving becomes not just a storage solution, but a design statement, showcasing a blend of practicality and aesthetic vision in a space often overlooked.

    The journey from raw space to stylish sanctuary is a testament to the transformative power of thoughtful design.

    FAQ Insights

    Can I use regular wood for open shelving in a humid bathroom?

    No. Regular wood is highly susceptible to warping, rotting, and mold growth in humid environments. Opt for treated lumber, marine-grade plywood, or water-resistant alternatives.

    How do I prevent items from getting dusty on open shelves?

    Regular dusting is key. Consider using glass-front cabinets or covering items with dust covers when not in use. Strategic placement of the shelving away from high-traffic areas can also minimize dust accumulation.

    What are some low-cost shelving options for an unfinished bathroom?

    Repurposed materials like reclaimed wood pallets (properly treated), industrial pipes, or even sturdy crates can offer cost-effective shelving solutions. Ensure proper treatment and secure mounting for durability.

    How often should I clean open shelves in a humid bathroom?

    Weekly cleaning is recommended to prevent mold and mildew growth. Use a mild soap and water solution, ensuring thorough drying afterwards.

    Are there any specific safety concerns when installing open shelving in an unfinished bathroom?

    Yes. Always use appropriate safety gear (eye protection, gloves), ensure proper wall anchoring, and be mindful of potential electrical hazards if working near wiring.

  • Modern Unfinished Bathroom with Lighting Design

    Modern Unfinished Bathroom with Lighting Design

    Modern unfinished bathrooms, a testament to industrial chic and raw aesthetics, offer a unique design challenge. The interplay of exposed materials—concrete, brick, reclaimed wood—with strategic lighting creates a captivating space. This exploration delves into the nuances of achieving a balanced aesthetic, examining the functional considerations of plumbing integration and material selection while highlighting the transformative power of lighting design in shaping the overall mood and ambiance.

    We will uncover how careful planning and material choices can create a functional and visually stunning bathroom, far from the sterile environments of traditional designs. The journey will illuminate the subtle science of light layering and its impact on the perceived space.

    This investigation moves beyond simple aesthetics, exploring the practical aspects of creating a durable, eco-friendly, and functional space. We will consider the advantages and disadvantages of various materials, analyze effective storage solutions within the constraints of an unfinished aesthetic, and examine the integration of plumbing fixtures in a way that complements rather than clashes with the overall design. The goal is to equip readers with the knowledge to design a modern unfinished bathroom that is both beautiful and practical, a space that reflects individual style and functionality.

    Design Aesthetics of Unfinished Bathrooms

    The aesthetic appeal of an unfinished bathroom lies in the deliberate exposure of raw materials and construction elements, creating a unique and often industrial-chic atmosphere. This approach contrasts sharply with traditional bathroom designs, emphasizing authenticity and a sense of process over polished perfection. The strategic use of lighting is crucial in shaping the overall mood and highlighting the textural beauty of the exposed materials.

    Modern Industrial Style

    This style celebrates the inherent beauty of raw materials such as exposed brick, concrete, or metal piping. The aesthetic is characterized by a minimalist approach, with functionality taking precedence over ornamentation. Darker color palettes, often incorporating greys, blacks, and metallic accents, are common. The unfinished nature of the space is embraced rather than concealed. Exposed ductwork, for instance, becomes a design feature rather than a flaw.

    The use of reclaimed wood adds another layer of texture and visual interest, enhancing the industrial feel.

    Rustic Farmhouse Style

    In contrast to the industrial aesthetic, the rustic farmhouse style employs natural materials such as exposed wood beams, stone, and unfinished plaster walls. This style evokes a sense of warmth and coziness, often incorporating vintage or repurposed elements. Lighting plays a vital role in softening the overall aesthetic; warmer toned lighting helps to create a welcoming atmosphere. The emphasis is on creating a space that feels lived-in and comfortable, while still maintaining a sense of modern functionality.

    The raw texture of the materials creates a tactile and inviting space.

    Minimalist Scandinavian Style

    This style prioritizes simplicity and functionality, using a limited palette of natural materials like light-colored wood, whitewashed brick, and smooth concrete. The unfinished elements are integrated seamlessly into the overall design, creating a clean and airy atmosphere. Lighting is crucial in enhancing the sense of spaciousness; bright, natural light is preferred, supplemented by strategically placed LED lighting to highlight specific features without overwhelming the space.

    The overall effect is a calming and uncluttered environment.

    Comparison of Design Styles

    The impact of different lighting schemes on the overall mood is significant. Ambient lighting provides general illumination, task lighting focuses on specific areas like the vanity, and accent lighting highlights architectural features or textural elements. The interplay of these lighting types is crucial for creating the desired atmosphere in each design style.

    Style Material Emphasis Lighting Scheme Overall Mood
    Modern Industrial Exposed brick, concrete, metal piping, reclaimed wood Combination of ambient and accent lighting, potentially using industrial-style fixtures Raw, edgy, minimalist, functional
    Rustic Farmhouse Exposed wood beams, stone, unfinished plaster, reclaimed wood Warm ambient lighting with task lighting at the vanity, possibly incorporating pendant lights Warm, inviting, cozy, rustic
    Minimalist Scandinavian Light-colored wood, whitewashed brick, smooth concrete Bright, natural light supplemented by strategically placed LED lighting Clean, airy, calm, uncluttered

    Material Selection and Functionality

    The choice of materials in an unfinished bathroom significantly impacts both its aesthetic appeal and its longevity. Durability against moisture, ease of maintenance, and visual harmony are key considerations. This section explores the properties of concrete, brick, and reclaimed wood within this context, and proposes a functional layout emphasizing practicality and visual coherence.The raw, industrial aesthetic of an unfinished bathroom lends itself to a range of materials, each with unique advantages and disadvantages.

    Careful consideration of these factors is crucial to achieving a space that is both stylish and functional.

    Concrete, Brick, and Reclaimed Wood in Unfinished Bathrooms

    Concrete, with its inherent strength and resistance to water damage when properly sealed, offers a robust and visually striking option for walls and flooring. However, its porous nature necessitates meticulous sealing to prevent moisture absorption and subsequent damage. The cold, hard texture of concrete can feel uninviting unless carefully mitigated through the use of underfloor heating or strategically placed textiles.

    Brick, similarly durable and water-resistant when sealed, adds a rustic, textured element. Its versatility allows for various laying patterns and finishes, offering considerable design flexibility. However, brick can be more challenging to clean and maintain than concrete, and its weight may necessitate structural considerations. Reclaimed wood, while offering a unique aesthetic and environmentally friendly alternative, requires careful selection and treatment to withstand the humid bathroom environment.

    The wood must be properly sealed and treated against rot and mold, potentially requiring more frequent maintenance than concrete or brick. Furthermore, the inherent variations in color and texture within reclaimed wood can either enhance or detract from the overall design depending on the desired aesthetic.

    Functional Layout for a Modern Unfinished Bathroom

    A functional layout for a modern unfinished bathroom prioritizes efficient use of space while maintaining a clean, uncluttered aesthetic. A linear arrangement, placing the shower, vanity, and toilet along one wall, maximizes floor space. Open shelving integrated into the wall structure provides ample storage without overwhelming the space. A large, centrally located mirror reflects light, enhancing the sense of spaciousness.

    Concealed storage within the vanity unit hides toiletries and other items, maintaining a minimalist look. The use of industrial-style metal shelving adds to the unfinished aesthetic while offering practical storage solutions for towels and other bathroom necessities. Consider incorporating a niche in the shower wall for storing shampoo and soap, minimizing the need for additional shelving within the shower area.

    Eco-Friendly and Durable Materials for Unfinished Bathrooms

    The selection of eco-friendly and durable materials is crucial for creating a sustainable and long-lasting unfinished bathroom. The following materials offer both aesthetic appeal and environmental responsibility:

    • Recycled Glass Tiles: These tiles offer a unique, textured surface and are made from recycled materials, reducing landfill waste. Their durability makes them suitable for high-moisture environments.
    • Bamboo Flooring: A rapidly renewable resource, bamboo flooring is naturally water-resistant and incredibly durable. Proper sealing further enhances its longevity and resistance to moisture.
    • Reclaimed Lumber (with appropriate treatment): As mentioned previously, reclaimed wood provides a unique character and environmental benefit, but requires careful treatment to ensure its suitability for a bathroom environment. Proper sealing and the use of water-resistant finishes are crucial.
    • Natural Stone (e.g., slate, limestone): These materials are naturally durable and resistant to moisture. Their inherent beauty adds a touch of elegance to the unfinished aesthetic. Choosing locally sourced stone minimizes transportation emissions.
    • Concrete (with appropriate sealant): Concrete, when properly sealed, offers exceptional durability and resistance to water damage. Using locally sourced aggregates reduces transportation costs and environmental impact.

    Lighting Design and Placement

    Illumination in an unfinished bathroom, while seemingly a minor detail, significantly impacts the overall aesthetic and functionality of the space. Proper lighting design not only enhances visibility for practical tasks but also creates a mood and atmosphere, transforming a utilitarian area into a visually appealing environment. The strategic layering of light sources is crucial for achieving depth and visual interest, mimicking the natural interplay of light found in well-lit spaces.Layering light sources in an unfinished bathroom achieves a balanced and functional illumination scheme.

    This approach contrasts with single-source lighting, which often creates harsh shadows and flattens the perception of space. Multiple light sources allow for adjustable brightness and a customizable ambiance, catering to various needs and moods. For example, a dimly lit space might be ideal for relaxation, while bright, task-oriented lighting is needed for activities like applying makeup or shaving.

    Types and Placement of Lighting Fixtures

    Three distinct types of lighting fixtures—recessed lighting, sconces, and pendant lights—offer diverse approaches to illuminating an unfinished bathroom. Each fixture type contributes uniquely to the layered lighting scheme, enhancing both the visual appeal and the functionality of the space. Their placement is key to maximizing their effectiveness.Recessed lighting, often referred to as downlights, provides general ambient illumination. These fixtures are integrated into the ceiling, offering unobtrusive yet effective overhead light.

    In an unfinished bathroom, recessed lighting should be strategically placed to eliminate dark corners and provide even coverage across the entire area. For example, positioning them in a grid pattern ensures uniform brightness.Sconces, mounted on the walls, provide task lighting and accent illumination. Their placement should be considered in relation to mirrors and vanities. Placing sconces flanking a mirror, for instance, provides ample light for grooming tasks, minimizing shadows on the face.

    This placement also adds a touch of elegance and sophistication to the design. The light emitted from sconces should be soft and diffused, preventing glare.Pendant lights offer a statement piece and focal point, particularly suitable for larger unfinished bathrooms. A single, well-designed pendant light above a vanity or freestanding tub can create a dramatic effect. However, it’s important to avoid overly large or overly small pendants relative to the space.

    A pendant light’s placement should consider the ceiling height and the overall design aesthetic to maintain a sense of balance and proportion. For instance, a tall ceiling might accommodate a larger pendant, while a lower ceiling would benefit from a smaller, more compact design.

    Mood Board Illustration

    Imagine a mood board showcasing three distinct lighting scenarios. Scenario one depicts the bathroom illuminated solely by recessed lighting, creating a clean, functional atmosphere, ideal for quick showers or cleaning. The overall light is bright and even, devoid of shadows. Scenario two introduces sconces, flanking a mirror, supplementing the recessed lighting. This adds a warmer, more intimate glow, suitable for tasks requiring precision, such as applying makeup.

    The shadows are softened, and the light is more focused. Finally, scenario three integrates a pendant light above the freestanding tub, creating a spa-like ambiance. The overall lighting is dimmer, more relaxed, and the pendant light acts as a visual anchor, drawing the eye to the tub area. The recessed and sconce lights provide a soft, ambient glow, complementing the pendant light’s focused illumination.

    This layered approach demonstrates the versatility of different lighting fixtures and their ability to create diverse moods within the same space.

    Plumbing and Fixture Integration

    Modern unfinished bathroom with lighting

    The integration of plumbing within an unfinished bathroom design presents a unique opportunity to showcase the raw beauty of the building’s infrastructure while maintaining functionality and aesthetic appeal. By thoughtfully incorporating exposed pipes and fittings, a designer can create a space that is both visually striking and authentically industrial or rustic. The key lies in carefully selecting fixtures that complement the exposed elements, creating a cohesive and sophisticated design.Exposed plumbing, often considered a flaw in traditional bathroom design, can be transformed into a striking focal point in an unfinished aesthetic.

    Consider, for instance, using black iron pipework, carefully painted and sealed for durability, to create a visually appealing framework for shelving or towel racks. The pipes themselves, with their inherent industrial aesthetic, can become a decorative element, contrasting beautifully against the raw concrete or exposed brick of the bathroom walls. Alternatively, copper pipes, with their naturally warm patina, can add a touch of rustic charm.

    Careful placement and strategic lighting can highlight these features, transforming them from functional necessities into design statements.

    Exposed Plumbing as a Design Feature

    Exposed plumbing, when strategically integrated, becomes a defining characteristic of the unfinished bathroom aesthetic. Instead of hiding pipes and valves, designers can incorporate them into the overall design. For example, a visibly running water pipe could serve as a decorative element along a wall, acting as a visual divider between the shower and vanity area. The exposed pipework could be strategically painted a contrasting color to create a bold accent, or left with its natural metallic finish for a more raw, industrial look.

    The visual effect is amplified when paired with appropriately chosen lighting that accentuates the textures and shapes of the exposed pipes.

    Faucet, Sink, and Showerhead Selection

    Choosing the right faucets, sinks, and showerheads is crucial for achieving a cohesive design within an unfinished bathroom. Industrial-style faucets, often made of matte black metal or brushed nickel with exposed pipes and simple, geometric designs, complement the raw aesthetic of unfinished walls and exposed plumbing. Concrete or reclaimed wood sinks, with their natural textures and organic forms, create a rustic counterpoint to the sleek lines of the faucets.

    Large, rain showerheads, perhaps with a minimalist design, add a touch of luxury while maintaining the overall industrial or rustic theme. The materials and finishes of these fixtures should ideally complement the exposed plumbing, creating a unified and intentional design.

    Plumbing Fixture Brands

    The selection of high-quality, aesthetically pleasing plumbing fixtures is paramount to the success of an unfinished bathroom design. Below is a list of five brands recognized for their modern and industrial designs that align well with this aesthetic:

    • KOHLER: Known for its wide range of styles, KOHLER offers many collections featuring industrial and modern designs, including matte black finishes and unique shapes that complement exposed plumbing.
    • American Standard: American Standard provides durable and stylish fixtures in a variety of finishes, with several lines incorporating clean lines and industrial-inspired details suitable for unfinished bathrooms.
    • Grohe: Grohe is recognized for its innovative designs and high-quality materials. Their collections often incorporate minimalist aesthetics and sleek metallic finishes that fit well with the industrial aesthetic.
    • Moen: Moen offers a broad selection of faucets and showerheads in various styles, including many with a modern or industrial feel. They often offer durable and long-lasting options in finishes like brushed nickel and matte black.
    • Delta Faucet: Delta provides a range of faucets and showerheads, with a focus on functionality and design. Their collections often include options that complement modern and industrial aesthetics, using materials and finishes like stainless steel and matte black.

    Visual Representation and Inspiration

    Modern unfinished bathroom with lighting

    The transformative power of design in an unfinished bathroom space lies in its ability to harness the inherent beauty of raw materials while cultivating a sense of intentional aesthetic. A key element in achieving this balance is the strategic use of natural light, which, when coupled with thoughtful material selection, can elevate the space from merely functional to genuinely inspiring.The interplay of light and shadow in a modern unfinished bathroom with large windows is a captivating spectacle.

    Sunlight, diffused through the glass, dances across the exposed brick or concrete walls, highlighting their texture and revealing subtle variations in color. The shifting light throughout the day creates a dynamic atmosphere, transforming the space from cool and serene in the morning to warm and inviting in the afternoon. This natural illumination minimizes the need for artificial lighting during daylight hours, contributing to energy efficiency and enhancing the overall mood.

    The effect is not merely visual; the influx of natural light also improves the psychological well-being of the occupants, enhancing their sense of connection with the outdoors and promoting a feeling of openness and spaciousness. This is supported by numerous studies demonstrating the positive correlation between natural light exposure and improved mood and productivity.

    Modern Unfinished Bathroom Visualization

    Imagine a spacious bathroom, its walls clad in reclaimed, rough-hewn brick, a palette of warm reds and oranges softened by time and weathering. The bricks are not uniformly aligned; some protrude slightly, adding to the sense of authenticity and history. Above a freestanding clawfoot tub, positioned centrally to maximize natural light, hangs a single, industrial-style pendant light, its metal cage a stark contrast to the organic texture of the brick.

    The floor is a polished concrete, cool and smooth underfoot, reflecting the light from the large window overlooking a verdant landscape. Pipes, painted a matte black, run along one wall, adding to the industrial aesthetic. A simple, minimalist vanity with a concrete countertop and a vessel sink completes the scene. The overall effect is one of raw elegance, a harmonious blend of rustic charm and modern minimalism.

    The lack of excessive ornamentation allows the natural beauty of the materials to take center stage.

    Suitable Color Palettes for Modern Unfinished Bathrooms

    The choice of color palette significantly influences the overall mood and feel of a modern unfinished bathroom. Selecting colors that complement the raw materials and the desired ambiance is crucial. Here are five palettes offering diverse aesthetic experiences:

    • Monochromatic Greys: This palette uses varying shades of grey, from charcoal to light dove grey, creating a sophisticated and calming atmosphere. The coolness of the grey is balanced by the warmth of the natural light and exposed brick.
    • Industrial Neutrals: Combining shades of beige, charcoal grey, and black, this palette reflects an industrial aesthetic. The use of metallic accents, such as brushed steel or copper, adds depth and texture.
    • Rustic Earths: This palette features warm, earthy tones like terracotta, ochre, and burnt sienna, emphasizing the natural beauty of exposed brick or concrete. These colors create a cozy and inviting space.
    • Modern Minimalist White: A stark white palette with minimal accents allows the texture of the unfinished materials to take center stage. This creates a clean, airy, and spacious feel. Subtle touches of black or grey add depth.
    • Deep Jewel Tones: This palette uses rich, deep colors like emerald green, sapphire blue, or ruby red, creating a dramatic and luxurious feel. These are best used as accents against a neutral backdrop to avoid overwhelming the space.

    Last Recap

    Modern unfinished bathroom with lighting

    Designing a modern unfinished bathroom with lighting requires a delicate balance of raw aesthetics and functional considerations. By carefully selecting materials like concrete, brick, or reclaimed wood, and strategically layering light sources – from ambient to accent lighting – one can create a space that is both visually stunning and highly functional. The exposed plumbing and thoughtfully chosen fixtures become integral design elements, enhancing the overall industrial or rustic feel.

    Ultimately, the success lies in the harmonious integration of these elements, resulting in a bathroom that is not only beautiful but also reflects the unique personality and lifestyle of its inhabitants. The result is a space that transcends the ordinary, a testament to the power of design and the allure of the unfinished.

    FAQ

    What are some common mistakes to avoid when designing an unfinished bathroom?

    Overlooking adequate ventilation to prevent moisture buildup, neglecting proper waterproofing around exposed elements, and failing to plan for sufficient storage are common pitfalls.

    How can I ensure the durability of exposed materials in a high-moisture environment?

    Proper sealing and the selection of moisture-resistant materials are crucial. Consult with a professional to ensure correct application of sealants and protective coatings.

    What are some cost-effective lighting options for an unfinished bathroom?

    LED lighting is energy-efficient and long-lasting, offering a range of styles and brightness levels suitable for various lighting schemes.

    Are there any safety concerns regarding exposed plumbing in a bathroom?

    Exposed plumbing should be installed by a qualified professional to ensure it meets safety codes and prevents leaks. Regular inspections are recommended.

    How can I incorporate natural light effectively into the design?

    Maximize natural light by using large windows and strategically placing mirrors to reflect light throughout the space. Consider using sheer curtains to diffuse harsh sunlight.

  • Small unfinished bathroom ideas maximizing space and style

    Small unfinished bathroom ideas maximizing space and style

    Transforming a small, unfinished bathroom into a functional and aesthetically pleasing space presents a unique challenge, demanding creative solutions and careful planning. This undertaking involves more than just slapping on paint; it requires a nuanced understanding of space optimization, budget-conscious material selection, and adherence to plumbing and electrical codes. From strategically placed mirrors to maximize light reflection and create the illusion of spaciousness, to the careful selection of low-flow fixtures to conserve water, every decision contributes to the final result.

    This exploration delves into practical techniques, budget-friendly options, and design considerations to guide you through the process of creating a stunning small bathroom, even from a raw, unfinished state.

    The journey begins with understanding the fundamental principles of space optimization. Built-in shelving, strategic use of mirrors, and clever storage solutions are key to maximizing functionality within limited square footage. Subsequently, we’ll explore budget-friendly materials, focusing on cost-effective yet stylish options for tiles, vanities, and lighting. Crucially, we’ll address the essential aspects of plumbing and electrical work, emphasizing code compliance and water conservation.

    Finally, the focus shifts to the visual appeal, examining various design styles and how to incorporate unique elements to create a personalized and inviting atmosphere. Through careful planning and execution, even the smallest unfinished bathroom can be transformed into a haven of comfort and style.

    Space Optimization Techniques for Small Bathrooms

    Bathroom small ideas design luxury hotel style meets minimalism european decorations homebnc

    Transforming a small, unfinished bathroom into a functional and aesthetically pleasing space requires strategic planning and the application of sound design principles. The limited square footage necessitates a focus on maximizing vertical space, employing clever storage solutions, and leveraging optical illusions to create a sense of spaciousness. This approach blends practicality with visual appeal, resulting in a bathroom that feels larger than its actual dimensions.

    Bathroom Layout with Built-in Shelving

    A well-designed layout is paramount in a small bathroom. Consider a 5′ x 6′ space. A vanity unit (2′ x 2′) positioned against one wall could incorporate a built-in sink and ample storage below. Opposite this, a shower enclosure (3′ x 3′) maximizes water efficiency and minimizes floor space. The remaining wall space can be dedicated to built-in shelving (1′ x 6′), constructed from moisture-resistant materials like melamine-coated MDF.

    These shelves provide storage for toiletries, towels, and other bathroom essentials. The shelves can be divided into sections of varying depths and heights to accommodate different items. A vertical medicine cabinet (1′ x 2′) above the vanity adds additional storage without encroaching on floor space. The color scheme should employ light and neutral tones to amplify the feeling of spaciousness.

    Illusions of Space: Mirrors and Light Colors

    The strategic use of mirrors and light colors significantly impacts the perceived size of a small bathroom. Mirrors reflect light, creating the illusion of depth and expanding the visual space. Light colors, especially whites and pastels, also reflect light, further enhancing this effect. The following table summarizes the pros and cons of these techniques:

    Technique Description Pros Cons
    Large Mirrors Placement of a large mirror, ideally opposite a window or light source. Doubles the perceived size of the room, brightens the space. Can be expensive, requires careful placement to avoid distortions.
    Light Colors Painting walls and using light-colored fixtures and accessories. Reflect light, create an airy feel, make the space seem larger. May show dirt more easily, might require more frequent cleaning.

    Storage Improvement Strategies

    Effective storage solutions are crucial in small bathrooms. Three key strategies are:

    Implementing these strategies ensures maximum utilization of available space and keeps the bathroom organized and clutter-free.

    • Recessed shelving: Building shelves into the walls creates hidden storage without sacrificing floor space. This is especially effective in areas above the toilet or under the vanity. The depth of these shelves can be customized to fit the specific needs of the user.
    • Over-the-door organizers: These organizers hang on the back of the bathroom door, providing extra storage for toiletries and cleaning supplies without occupying valuable floor or wall space. They are readily available in various sizes and designs to match different bathroom aesthetics.
    • Vertical storage units: Tall, narrow cabinets or shelving units maximize vertical space. These units can be placed in corners or along walls, providing ample storage without overwhelming the small space. The units should be designed with adjustable shelves for flexible storage options.

    Utilizing Vertical Space

    Vertical space is often underutilized in small bathroom design. Think beyond standard shelving. Consider installing tall, narrow cabinets that reach the ceiling. These can house towels, toiletries, and cleaning supplies, freeing up valuable floor space. A visually appealing approach involves using a combination of open and closed storage.

    Open shelving can display decorative items while closed cabinets conceal less visually appealing items. For example, a tall, narrow cabinet with glass-fronted doors at the top could display decorative bottles and jars, while the lower section, with solid doors, could store cleaning supplies. Another example is using the space above the toilet for a narrow, floor-to-ceiling cabinet. This maximizes vertical space while keeping the floor clear.

    Visualize a sleek, white cabinet extending from floor to ceiling, seamlessly integrating with the overall bathroom design.

    Budget-Friendly Finishing Materials and Fixtures

    Transforming a small, unfinished bathroom into a stylish and functional space doesn’t require breaking the bank. Careful selection of materials and fixtures can achieve a high-impact renovation while remaining within a reasonable budget. This section details cost-effective options that balance affordability with aesthetic appeal and durability. We’ll explore budget-friendly tile choices, compare various vanity types, design a cost-effective lighting scheme, and Artikel the steps for installing a simple yet effective shower kit.

    Affordable and Stylish Bathroom Tile Options

    Selecting the right tiles is crucial for a small bathroom, as they significantly impact the visual perception of space. Lighter colors and smaller tiles generally create a feeling of spaciousness. Here are some budget-friendly options:

    • Ceramic Tiles: Ceramic tiles offer a wide range of colors, patterns, and finishes at a relatively low cost. Expect to pay between $1-$5 per square foot, depending on the quality and design. A classic white subway tile creates a clean, timeless look, while more textured options can add visual interest. Imagine a small bathroom brightened by glossy white ceramic tiles, reflecting light and enhancing the feeling of spaciousness.

    • Porcelain Tiles: Slightly more expensive than ceramic, porcelain tiles are more durable and water-resistant, making them ideal for bathrooms. Prices typically range from $2-$8 per square foot. A light grey porcelain tile with a subtle texture can add a touch of sophistication without overwhelming a small space. Think of a subtle, textured pattern that adds visual depth without being overly busy.

    • Glass Tiles: Glass tiles can add a modern and luxurious feel, reflecting light and creating a sense of spaciousness. Prices vary widely, but you can find budget-friendly options starting around $3-$10 per square foot. A small mosaic of clear or lightly tinted glass tiles as an accent wall can make a big impact. Visualize a shimmering accent wall behind a vanity, adding a touch of elegance.

    Comparison of Budget-Friendly Vanities

    The vanity is a focal point in any bathroom, and choosing the right one is essential for both functionality and aesthetics. Here’s a comparison of three budget-friendly options:

    Vanity Type Material Pros Cons
    Pre-fabricated Vanity Laminate, MDF Affordable, readily available, easy to install May not be as durable as solid wood, limited customization options
    DIY Vanity from repurposed materials (e.g., old dresser) Reclaimed wood, painted MDF Unique, eco-friendly, highly customizable Requires DIY skills, may require more time and effort
    Simple pedestal sink Ceramic or porcelain Space-saving, clean lines, easy to clean Limited storage, may not be suitable for all bathroom layouts

    Cost-Effective Lighting Plan for a Small Bathroom

    Proper lighting is essential for creating a functional and inviting atmosphere in a small bathroom. A layered approach using different types of lighting maximizes both functionality and ambiance.

    • Recessed Lighting: Recessed lights provide general illumination, evenly distributing light across the ceiling. Their unobtrusive design helps maintain a clean, uncluttered look, ideal for small spaces. Install 2-3 recessed lights, depending on the bathroom’s size, ensuring even coverage. The effect is a bright, evenly lit space, preventing dark corners.
    • Vanity Lighting: Vanity lights illuminate the sink area, providing task lighting for applying makeup or shaving. Consider LED vanity lights with adjustable brightness for optimal control. Two wall-mounted sconces flanking the mirror create a balanced and functional light source. The result is focused illumination on the vanity area, enhancing functionality and reducing shadows.
    • Accent Lighting: A small, waterproof LED strip light installed under the vanity cabinet adds a subtle, ambient glow. This creates a warm, inviting atmosphere and subtly illuminates the floor, making the space feel larger. The visual effect is a gentle, welcoming light, enhancing the overall ambiance.

    Installing a Budget-Friendly Shower Kit

    A pre-fabricated shower kit offers a simple and cost-effective solution for a small bathroom. These kits typically include a shower pan, walls, and a door, simplifying the installation process.

    1. Prepare the Shower Area: Ensure the floor is level and waterproofed. This may involve installing a waterproof membrane or tiling the shower floor.
    2. Assemble the Shower Pan: Follow the manufacturer’s instructions to assemble the shower pan, ensuring it is level and securely placed.
    3. Install the Shower Walls: Attach the shower walls to the shower pan, ensuring they are plumb and level. Use appropriate sealant to prevent water leaks.
    4. Install the Shower Door: Carefully install the shower door, following the manufacturer’s instructions. Ensure the door seals properly to prevent water leakage.
    5. Caulk and Finish: Apply caulk around the edges of the shower pan and walls to create a watertight seal. Finish with any necessary trim pieces.

    Plumbing and Electrical Considerations

    Small unfinished bathroom ideas

    Transforming an unfinished small bathroom into a functional and safe space necessitates careful planning and execution of plumbing and electrical work. Ignoring these crucial aspects can lead to costly repairs, safety hazards, and significant inconvenience. This section details essential considerations for ensuring a compliant and efficient bathroom installation.

    Rough-in Plumbing for Small Bathrooms

    Rough-in plumbing involves installing the water supply and drainage pipes before the walls and flooring are finished. Precise measurements and adherence to building codes are paramount. A typical small bathroom rough-in might include a toilet flange, supply lines for the sink and toilet, and drain lines for the sink, shower (if included), and toilet. These lines are typically made of PVC or ABS plastic for their durability and resistance to corrosion.

    Proper sloping of drain lines (typically 1/4 inch per foot) is critical to prevent clogs. The toilet flange, a metal ring bolted to the floor, provides a secure base for the toilet. Precise positioning of all components is essential to ensure proper fixture placement and efficient water flow. Imagine a diagram showing the toilet flange centrally located, with supply lines running from shut-off valves (located behind the wall) to the toilet and sink, and drain lines connecting the sink and toilet to the main drain stack.

    The drain lines slope gently downward towards the main drain. All connections should be carefully sealed with appropriate plumbing cement to prevent leaks. Specifications for pipe diameter and materials should adhere to local building codes.

    Potential Electrical Code Violations and Solutions

    Small bathrooms, due to their limited space, often present challenges in meeting electrical codes. Common violations include insufficient GFCI (Ground Fault Circuit Interrupter) protection, inadequate lighting, and improper wiring. GFCI outlets are mandatory within six feet of any water source to prevent electric shock. Lack of GFCI protection is a significant safety hazard. Solutions involve installing GFCI outlets in appropriate locations.

    Inadequate lighting can create unsafe conditions, particularly in smaller spaces. Solutions include installing appropriately rated and correctly wired lighting fixtures, potentially including exhaust fans with integrated lighting for ventilation and illumination. Improper wiring, such as using incorrect gauge wire or failing to properly ground fixtures, poses a fire hazard. Solutions require careful adherence to wiring diagrams and local electrical codes, potentially requiring professional electrical work to ensure safety and compliance.

    Low-Flow Toilet and Faucet Installation

    Installing low-flow fixtures is crucial for water conservation. A low-flow toilet typically uses 1.28 gallons or less per flush, significantly reducing water consumption compared to older models. Installation involves removing the old toilet, aligning the new toilet with the existing flange, and securing it with bolts. A wax ring creates a watertight seal between the toilet and the flange.

    Connecting the water supply line completes the installation. Low-flow faucets typically use 1.5 gallons per minute or less. Installation involves replacing the old faucet cartridges with low-flow cartridges and ensuring proper sealing to prevent leaks. A step-by-step process for a low-flow toilet might include: (1) Turning off the water supply, (2) disconnecting the water supply line, (3) removing the old toilet, (4) applying a new wax ring, (5) setting the new toilet in place, (6) securing the toilet with bolts, (7) reconnecting the water supply line, (8) testing for leaks.

    A similar process applies to low-flow faucets, with additional steps depending on the faucet type.

    Ventilation in Small Bathrooms

    Proper ventilation is essential to prevent mold and mildew growth, which are common in small, humid bathrooms. Insufficient ventilation can lead to respiratory problems and structural damage. A properly sized exhaust fan, typically rated for the bathroom’s cubic footage, should be installed to remove moisture-laden air. The fan should be vented to the outside to effectively remove moisture.

    Solutions for improving air quality include installing a high-efficiency exhaust fan with a timer or humidity sensor for automatic operation. Adequate natural ventilation, where possible, can supplement mechanical ventilation. Consider the size of the bathroom when selecting an exhaust fan; a larger bathroom requires a more powerful fan. For example, a 50-square-foot bathroom might need a fan with a CFM (cubic feet per minute) rating of 50 or higher.

    Regular cleaning of the exhaust fan and vent is crucial for maintaining optimal performance.

    Visual Appeal and Design Elements

    The visual appeal of a small bathroom is paramount; it dictates the overall mood and functionality of the space. Careful consideration of design elements, color palettes, and material choices can transform a cramped, unfinished room into a relaxing and efficient oasis. The following sections explore three distinct design styles, practical applications of unique design elements, and a detailed example of a small bathroom incorporating a walk-in shower.

    We will also examine how color and texture can contribute to a sense of spaciousness and calm.

    Mood Board: Three Small Bathroom Design Styles

    Three distinct design styles – modern, rustic, and minimalist – are presented below, each offering a unique aesthetic and approach to space optimization in a small bathroom. These styles demonstrate the versatility of design choices available even within a limited area.

    • Modern: This style emphasizes clean lines, sleek fixtures, and a neutral color palette. Imagine a space dominated by crisp white walls, complemented by matte black accents in the faucets and shower fittings. The flooring could be large-format, light-grey porcelain tiles, creating a sense of spaciousness. A minimalist vanity with integrated sink and ample storage would complete the look.

      The overall feel would be sophisticated and uncluttered.

    • Rustic: This style embraces natural materials and warm tones. Picture exposed brick walls (or brick-effect tiles), a wooden vanity with a distressed finish, and a shower with pebble-like mosaic tiles. The color palette would include earthy browns, creams, and muted greens. Natural light would be maximized, and perhaps a single, strategically placed pendant light with a rustic metal finish would add character.

      The overall mood would be cozy and inviting.

    • Minimalist: This style prioritizes simplicity and functionality. Imagine a monochromatic scheme, perhaps using shades of grey and white. The walls would be smooth and unadorned, the flooring a simple, light-colored tile. A floating vanity with integrated storage would maximize floor space. The shower would be a simple, frameless enclosure with a single rainfall showerhead.

      The overall effect would be clean, serene, and unfussy.

    Incorporating Unique Design Elements

    The strategic use of unique design elements can dramatically enhance the visual interest of a small bathroom. Even subtle additions can create a significant impact.

    • Patterned Tiles: Using patterned tiles as a focal point on a single wall, such as the shower surround or behind the vanity, adds visual texture without overwhelming the space. A geometric pattern in a neutral color palette would work well in a modern bathroom, while a floral or arabesque pattern could enhance a rustic design.
    • Interesting Lighting Fixtures: A statement lighting fixture, such as a unique pendant light or a stylish wall sconce, can become a focal point and draw the eye upwards, making the ceiling appear higher. The light fixture’s style should complement the overall design scheme; for instance, a sleek, minimalist fixture would be suitable for a modern bathroom, while a wrought iron fixture might be appropriate for a rustic design.

    • Statement Mirrors: A large, uniquely framed mirror can not only be functional but also a striking design element. A mirror with an ornate frame can add elegance to a traditional design, while a simple, frameless mirror can enhance a minimalist space. Strategically placed mirrors can also create the illusion of more space by reflecting light and amplifying the perceived size of the room.

    Small Bathroom Design with Walk-in Shower

    This design features a small bathroom (approximately 4ft x 6ft) with a walk-in shower.Imagine a space with white subway tiles on the walls, creating a clean and bright atmosphere. The floor is composed of large, light grey porcelain tiles for a sense of spaciousness. A small, floating vanity with a white countertop and a vessel sink sits against one wall.

    The walk-in shower (3ft x 3ft) features clear glass walls and a rainfall showerhead, maximizing the sense of openness. The shower walls are clad in the same white subway tiles as the rest of the bathroom, creating a cohesive look. A small niche in the shower wall provides space for toiletries.

    Color and Texture for Spaciousness and Calm

    Element Description Effect Example
    Wall Color Light, neutral colors (white, light grey, pale blue) Reflects light, making the space feel larger and brighter. White subway tiles with grey grout.
    Floor Color Light-colored tiles or flooring (light grey, beige) Creates a sense of continuity with the walls, minimizing visual breaks. Large-format light grey porcelain tiles.
    Texture Smooth surfaces (polished tiles, glass shower enclosure) Minimizes visual clutter and creates a sense of calm. Frameless glass shower enclosure.
    Accents Subtle pops of color (towels, artwork) Adds visual interest without overwhelming the space. A set of sage green towels.

    Final Conclusion

    Renovating a small, unfinished bathroom is a rewarding endeavor that blends creativity, practicality, and technical expertise. By carefully considering space optimization techniques, selecting budget-friendly yet stylish materials, ensuring compliance with plumbing and electrical codes, and incorporating thoughtful design elements, the transformation from a raw space to a functional and aesthetically pleasing bathroom becomes achievable. Remember, the key lies in strategic planning, meticulous execution, and a keen eye for detail.

    The result? A small bathroom that punches far above its weight in style and functionality, a testament to the power of thoughtful design and careful craftsmanship.

    Detailed FAQs

    What are some common mistakes to avoid when renovating a small unfinished bathroom?

    Common mistakes include neglecting proper ventilation, overlooking electrical code requirements, using dark colors that make the space feel smaller, and insufficient planning for storage.

    How can I ensure proper ventilation in a small bathroom?

    Install an exhaust fan with a high CFM (cubic feet per minute) rating and ensure it vents directly to the outside. Consider adding a window if possible for natural ventilation.

    What are some eco-friendly options for a small bathroom renovation?

    Use reclaimed or recycled materials, choose low-VOC paints, install low-flow toilets and faucets, and opt for energy-efficient lighting.

    How much should I budget for a small unfinished bathroom renovation?

    Costs vary greatly depending on materials and fixtures chosen. A basic renovation might cost a few thousand dollars, while a high-end remodel could cost tens of thousands.

    Can I do some of the work myself to save money?

    Many tasks, like painting and installing shelving, can be DIY projects. However, plumbing and electrical work should generally be left to licensed professionals.

  • Minimalist Shower Room Ideas Design & Functionality

    Minimalist Shower Room Ideas Design & Functionality

    The minimalist aesthetic, characterized by its clean lines, uncluttered spaces, and functional design, translates beautifully to the shower room. This sanctuary of daily renewal can be transformed into a haven of calm and efficiency through careful consideration of space, materials, and lighting. By embracing the core principles of minimalism—intentionality, simplicity, and functionality—we can create a shower room that is both visually appealing and supremely practical.

    This exploration delves into the science of creating a minimalist shower space, examining the impact of material choices, spatial optimization techniques, and lighting design on the overall user experience.

    From optimizing small spaces with clever storage solutions to selecting the perfect showerhead and lighting fixtures, we’ll navigate the practical aspects of minimalist design. The interplay between natural light, carefully chosen color palettes, and the strategic use of textures will be analyzed to demonstrate how to achieve a serene and visually harmonious environment. We will also explore the impact of different tile choices and the incorporation of subtle natural elements to elevate the aesthetic without compromising the minimalist ethos.

    Defining Minimalist Shower Room Aesthetics

    Shower walk designs look attractive these designrulz source

    Minimalist design, characterized by its intentional simplicity and functionality, translates seamlessly into the shower room environment. By stripping away unnecessary elements and focusing on essential features, a minimalist shower room creates a serene and efficient space. This approach leverages the principles of reductionism, prioritizing clean lines, neutral color palettes, and high-quality, durable materials. The goal is not austerity, but rather a carefully curated atmosphere that promotes relaxation and well-being.

    Core Principles of Minimalist Shower Room Design

    The core tenets of minimalist shower room design revolve around functionality, simplicity, and a sense of calm. Clutter is eliminated, with only essential fixtures and fittings retained. The emphasis is on clean lines and uncluttered surfaces. A sense of spaciousness is achieved through strategic use of light and reflective surfaces. The overall effect is a space that feels both luxurious and unburdened.

    This approach prioritizes quality over quantity, investing in durable, high-quality materials that will withstand the demands of a frequently used space.

    Color Palettes in Minimalist Shower Rooms

    Minimalist shower rooms typically employ muted and neutral color palettes. Monochromatic schemes, utilizing variations of a single color, are common. Think soft greys, calming blues, or warm, earthy tones. White remains a popular choice, reflecting light and enhancing the feeling of spaciousness. The use of black accents can add a touch of sophistication and visual interest, but it is crucial to maintain balance and avoid overwhelming the space.

    Examples include a predominantly white shower with black grout lines or black fixtures against a white backdrop. The avoidance of bold, saturated colors contributes to the overall feeling of serenity and tranquility.

    Natural Materials in Minimalist Shower Room Design

    The incorporation of natural materials significantly enhances the minimalist aesthetic. Stone, particularly marble or slate, offers both durability and visual appeal. Its natural veining adds subtle texture and visual interest without detracting from the overall minimalist feel. Wood, when treated appropriately for moisture resistance, can add warmth and a touch of organic texture. Consider using teak or other water-resistant hardwoods for shelving or accents.

    These natural materials contribute to a sense of grounding and connection to nature, complementing the clean lines and simplicity of the overall design.

    Minimalist Shower Room Layouts

    The following descriptions illustrate three distinct minimalist shower room layouts, each varying in size and functionality:

    Layout 1: Compact Shower Room This design prioritizes efficiency in a small space. A single, walk-in shower with a glass enclosure maximizes space. A simple, wall-mounted shower head and a single, integrated shelf for toiletries are the only fixtures. The walls are clad in large format, light grey tiles, enhancing the sense of spaciousness. The floor is tiled with matching tiles.

    This design emphasizes functionality and clean lines within a limited footprint.

    Layout 2: Medium-Sized Shower Room with Bench This design balances functionality and comfort. It features a walk-in shower with a built-in bench, perfect for resting while showering. A single, rainfall shower head and a handheld shower head provide flexibility. A floating vanity with a minimalist sink and mirror completes the space. Natural stone tiles are used on the floor and walls, adding a touch of elegance.

    The overall design creates a spa-like atmosphere.

    Layout 3: Large Shower Room with Double Shower Heads and Separate Vanity Area This design prioritizes luxury and ample space. It includes a large walk-in shower with two shower heads, one rainfall and one handheld. A separate vanity area with a double sink and ample counter space is incorporated. The walls are clad in large format marble tiles, while the floor is finished with matching marble. This design emphasizes both functionality and high-end aesthetics, offering a luxurious showering experience.

    Space Optimization and Functionality

    The minimalist aesthetic, characterized by its clean lines and uncluttered surfaces, finds particular resonance in the often-constrained space of a shower room. Effective space optimization is paramount, demanding a strategic approach that blends functionality with visual appeal. By carefully selecting fixtures and employing clever storage solutions, even the smallest shower room can achieve a sense of spaciousness and effortless elegance.

    Maximizing space in small shower rooms relies on the principles of thoughtful design and efficient use of vertical and horizontal dimensions. The strategic placement of fixtures, such as a wall-mounted showerhead and a compact vanity, immediately frees up floor space. Furthermore, the careful selection of transparent or light-colored materials can visually expand the perceived size of the room, creating an illusion of greater spaciousness.

    The use of mirrors, strategically positioned to reflect light and expand the visual field, is another effective technique. This approach leverages the principles of perceptual psychology, manipulating the viewer’s experience of the space to create a more open and inviting atmosphere.

    Practical Storage Solutions for Minimalist Shower Rooms

    Storage in a minimalist shower room should be both functional and aesthetically pleasing, seamlessly integrating with the overall design. Recessed shelving, built into the shower walls, offers a discreet and space-saving solution for toiletries and other essentials. A sleek, floating vanity with integrated drawers provides ample storage without cluttering the floor. Corner shelves, utilizing often-underutilized space, can be incorporated for extra storage capacity.

    Transparent containers or baskets can further enhance the minimalist aesthetic while keeping items organized and easily accessible. The key is to maintain a sense of order and visual clarity, avoiding the impression of overcrowding.

    Comparison of Showerhead Types for Minimalist Aesthetics

    The choice of showerhead significantly impacts the minimalist aesthetic of a shower room. Rainfall showerheads, with their wide, overhead spray, offer a luxurious and visually appealing experience, while their streamlined design contributes to a clean and uncluttered look. However, their larger size may not be suitable for all small shower rooms. Handheld showerheads provide flexibility and versatility, particularly in smaller spaces, and their compact design contributes to a minimalist aesthetic.

    A minimalist approach often favors a single, high-quality showerhead rather than multiple options, prioritizing functionality and visual simplicity.

    Essential Fixtures for a Minimalist Shower Room

    The selection of fixtures plays a crucial role in achieving a minimalist aesthetic. The focus should be on high-quality, durable materials with clean lines and simple designs. Avoid ornate or overly decorative elements, opting instead for functionality and understated elegance.

    Fixture Material Size (Approximate) Visual Description
    Showerhead Brushed Nickel or Matte Black 8-12 inches diameter Sleek, circular design with minimal detailing; ideally a rainfall or single-function handheld model.
    Shower Faucet Stainless Steel or Chrome Variable, depending on model; generally compact and streamlined Simple, lever-style handles; clean lines and minimal ornamentation.
    Vanity Solid wood or high-gloss laminate 24-36 inches wide, depending on space Floating design with integrated drawers or a single, clean-lined cabinet.
    Mirror Frameless glass Variable, depending on space; ideally full-length or wall-to-wall Simple, rectangular or square shape; frameless for a clean, minimalist look.
    Lighting LED strip lights or recessed lighting Variable, depending on the fixture Soft, diffused light; avoids harsh shadows; integrated into the ceiling or walls for a seamless look.

    Lighting and Ambiance

    The careful selection and placement of lighting is paramount in achieving the serene and calming atmosphere characteristic of a minimalist shower room. Light, in its various forms and intensities, profoundly impacts our perception of space, influencing mood and even our physiological responses. Understanding this relationship allows us to design a shower space that is not only aesthetically pleasing but also promotes relaxation and well-being.The interplay of light and shadow is crucial in minimalist design, where clean lines and uncluttered surfaces dominate.

    Too much harsh light can disrupt this balance, while insufficient illumination can create a claustrophobic feel. The goal is to create a soft, diffused light that enhances the room’s spatial qualities without overwhelming the senses. This is achieved through a combination of carefully chosen fixtures and a considered approach to natural light integration.

    Lighting Fixture Selection for Minimalist Design

    Minimalist aesthetics prioritize simplicity and functionality. Lighting fixtures should reflect this philosophy, avoiding overly ornate or complex designs. Clean lines, simple shapes, and neutral colors are key. Recessed lighting, for instance, offers a seamless integration into the ceiling, minimizing visual clutter. Linear LED strips, often concealed within architectural features, provide a subtle and even illumination.

    Pendant lights, when used sparingly, can add a touch of elegance, provided they maintain a minimalist aesthetic. Materials like brushed nickel, matte black, or even clear glass complement a minimalist palette.

    A Lighting Scheme for a Minimalist Shower Room

    Consider a three-tiered approach: ambient, task, and accent lighting. Ambient lighting provides overall illumination. This could be achieved with recessed LED downlights spaced evenly across the ceiling, offering a soft, diffused glow. Task lighting, crucial for safety and functionality, is provided by waterproof LED spotlights positioned above the showerhead and near the vanity. These lights ensure adequate illumination for showering and grooming tasks without harsh shadows.

    Accent lighting adds a touch of warmth and drama. A single, minimalist pendant light positioned centrally above the shower, or a subtly illuminated niche within the shower enclosure, can provide this focal point. All fixtures should ideally be dimmable to allow for adjustment according to preference and time of day.

    Impact of Natural Light

    Natural light significantly enhances the minimalist aesthetic. Large windows or skylights, if feasible, flood the shower room with natural illumination, creating a bright, airy, and spacious feel. This abundant light minimizes the need for artificial lighting during the day, promoting energy efficiency and reinforcing the clean lines of the minimalist design. However, it’s crucial to manage direct sunlight, which can be harsh and potentially create glare.

    Sheer curtains or blinds can help diffuse the light, maintaining a soft and even distribution. The interplay of natural and artificial light, thoughtfully orchestrated, elevates the shower room experience, transforming it into a sanctuary of calm and serenity.

    Minimalist Shower Room Accessories and Fixtures

    Room bathroom wet shower ideas design modern japanese bathrooms tile small rooms interior tub wetroom designs cons pros bath bathtub

    The pursuit of a minimalist shower room hinges not only on spatial design but also on a careful selection of accessories and fixtures. Functionality must remain paramount, but the aesthetic should reflect the core principles of minimalism: simplicity, clean lines, and a sense of calm. The right choices can transform a small space into a sanctuary, while the wrong ones can quickly clutter and disrupt the intended atmosphere.The key to achieving a minimalist aesthetic lies in prioritizing essential items and eliminating unnecessary clutter.

    This involves a conscious decision to select pieces that are both functional and visually unassuming, blending seamlessly into the overall design. Overly ornate or brightly colored accessories should be avoided in favor of neutral tones and streamlined forms. The goal is to create a space that feels spacious, uncluttered, and inherently relaxing.

    Essential Accessories and Fixtures

    A minimalist shower room requires only a few key accessories and fixtures to function effectively. These should be chosen for their durability, ease of cleaning, and understated design. Over-the-top features are unnecessary; focus on quality and longevity. For example, a single, high-quality rainfall showerhead offers a luxurious experience without the visual clutter of multiple showerheads. A simple, integrated soap dish recessed into the wall eliminates unnecessary protrusions.

    Similarly, a sleek, single-lever mixer tap provides precise temperature control without excessive visual complexity. The focus is on functionality delivered with elegant simplicity.

    Non-Essential Items to Avoid

    Many items commonly found in shower rooms are unnecessary in a minimalist setting. Their presence detracts from the clean lines and sense of space that are crucial to the minimalist aesthetic.

    • Multiple caddies or baskets: These create visual clutter and can be easily replaced by built-in shelving.
    • Ornate shower curtains: A simple, clear shower screen or a solid-colored, plain curtain is preferable.
    • Decorative bath mats: A simple, absorbent, non-slip mat in a neutral color is sufficient.
    • Excessive toiletries: Keep only essential items on display, storing others elsewhere.
    • Oversized or brightly colored towels: Opt for neutral-colored towels in a high-quality, absorbent material, stored neatly in a discreet location.

    Benefits of Built-in Shelving and Storage Solutions

    Built-in shelving and storage solutions are invaluable in a minimalist shower room. They maximize space efficiency while maintaining a clean, uncluttered look. Unlike freestanding units, they integrate seamlessly into the design, avoiding the visual disruption of added elements. Furthermore, they allow for discreet storage of toiletries and other shower accessories, keeping the space organized and free from visual clutter.

    The careful placement of built-in shelving can also enhance the overall functionality of the room, providing easy access to frequently used items. For example, a recessed niche near the showerhead is perfect for shampoo and conditioner bottles.

    Visual Impact of Different Shower Doors

    The choice of shower door significantly impacts the overall aesthetic of a minimalist shower room. Frameless shower doors, with their sleek, minimalist design, create a sense of openness and spaciousness. The absence of visible frames maximizes the feeling of uninterrupted space, a key element in minimalist design. Conversely, framed shower doors, while more affordable, can appear heavier and more visually intrusive, potentially detracting from the clean lines of a minimalist design.

    The choice depends on the specific aesthetic goals and the overall design of the shower room. A frameless door is generally preferred for a truly minimalist look, offering an uninterrupted visual flow and a sense of spaciousness that complements the overall aesthetic.

    Visual Inspiration and Design Examples

    The visual impact of a minimalist shower room hinges on the careful selection of materials and the strategic application of design principles. Understanding how different elements interact to create a sense of calm and spaciousness is crucial for achieving the desired aesthetic. This section explores the visual effects of various design choices, focusing on tile selection, plant integration, and the subtle use of texture and pattern.

    The choice of tile significantly influences the overall visual perception of a minimalist shower room. Large format tiles, for instance, create a sense of spaciousness by minimizing grout lines and visually expanding the area. Their clean lines and uninterrupted surfaces contribute to the minimalist aesthetic, allowing the eye to rest without visual clutter. Conversely, smaller tiles, such as subway tiles, offer a different visual experience.

    The repeating pattern of subway tiles can introduce a subtle rhythm and texture, but their smaller size can make the space feel more detailed and potentially less open, depending on the color and grout choice. The color of the tile itself plays a vital role; light, neutral tones enhance the feeling of spaciousness and light reflection, whereas darker shades can create a more intimate and moody atmosphere, which may still fit a minimalist concept if used sparingly and with contrasting elements.

    Tile Choice and Visual Impact

    The interplay between tile size, color, and grout choice significantly impacts the visual perception of a minimalist shower room. Large format tiles (e.g., 24×48 inches or larger) minimize grout lines, leading to a cleaner, more expansive feel. The uninterrupted surface creates a sense of calm and reduces visual noise. Conversely, smaller format tiles like subway tiles (typically 3×6 inches) introduce a subtle pattern and texture, potentially adding visual interest but potentially reducing the perceived spaciousness if not carefully considered.

    Light-colored tiles generally maximize light reflection, making the space appear larger and brighter, while darker tiles can create a more intimate atmosphere, requiring careful consideration to avoid making the space feel cramped. The grout color also matters; a grout color that closely matches the tile color minimizes visual disruption, while contrasting grout can add a subtle design element.

    Descriptive Phrases for Minimalist Shower Room Design

    A concise and evocative description is essential for capturing the essence of a minimalist shower room design. The following phrases highlight key characteristics and create a strong visual image.

    • Serene sanctuary of streamlined simplicity
    • Clean lines, uncluttered calm
    • Spatially expansive, visually restful
    • Refined elegance, understated luxury
    • Effortless sophistication, functional purity

    Incorporating Plants in a Minimalist Shower Room

    Introducing greenery can enhance the ambiance of a minimalist shower room without compromising its uncluttered aesthetic. The key is strategic placement and selection of appropriate plants. Oversized plants should be avoided. Instead, consider small, low-maintenance plants like pothos or peace lilies in sleek, minimalist planters. These plants can thrive in the humid environment of a shower room and add a touch of life and color without overwhelming the space.

    Hanging planters can also be used effectively to maximize vertical space and avoid cluttering the floor or surfaces.

    Texture and Pattern in Minimalist Shower Room Design

    While minimalism prioritizes simplicity, the strategic use of texture and pattern can add depth and visual interest without sacrificing the overall clean aesthetic. The key is restraint. A single textural element, such as a textured tile with a subtle pattern or a natural stone countertop with subtle veining, can add visual interest without overwhelming the space. Avoid busy patterns or clashing textures; instead, opt for subtle variations that complement each other and enhance the overall design cohesiveness.

    For example, a smooth, matte-finish tile could be paired with a slightly textured shower curtain or a single, elegantly patterned bathmat. The goal is to introduce a touch of tactile interest without sacrificing the overall minimalist feel of clean lines and uncluttered surfaces.

    End of Discussion

    Creating a minimalist shower room is not merely about stripping away excess; it’s about carefully curating a space that fosters both functionality and tranquility. By understanding the principles of minimalist design and applying them strategically, we can transform a typically utilitarian space into a personal sanctuary. The conscious selection of materials, lighting, and fixtures, coupled with an intelligent approach to space optimization, culminates in a shower room that is both visually stunning and highly efficient.

    The result is a space that reflects a mindful approach to design, prioritizing both aesthetics and practical functionality.

    Question Bank

    What are the best colors for a minimalist shower room?

    Neutral palettes like whites, grays, and beiges are popular choices. Subtle earth tones or cool blues can also create a calming atmosphere. The key is to maintain a cohesive and uncluttered color scheme.

    How can I make my small shower room feel bigger?

    Use light colors on walls and floors to reflect light, maximize vertical space with tall, narrow shelving, and install a frameless shower door to eliminate visual barriers.

    Are there any specific tile sizes ideal for minimalist shower rooms?

    Large-format tiles create a clean, uncluttered look, minimizing grout lines. Subway tiles, while smaller, can also be effective, especially in a grid pattern.

    What type of showerhead is best for a minimalist design?

    Rainfall showerheads offer a modern, minimalist aesthetic. However, a sleek, minimalist handheld showerhead can also be very effective.

    How much storage is really necessary in a minimalist shower room?

    Prioritize only essential items. Built-in shelving or recessed niches are ideal for maintaining a clean look while providing sufficient storage.

  • Minimalist Bathroom Lighting Design & Illumination

    Minimalist Bathroom Lighting Design & Illumination

    The minimalist aesthetic, celebrated for its clean lines and uncluttered spaces, extends its influence even to the sanctuary of the bathroom. Minimalist bathroom lighting, far from being merely functional, becomes a crucial element in crafting a serene and sophisticated atmosphere. This exploration delves into the science of light, examining how color temperature, brightness, and fixture selection contribute to the overall ambiance and functionality of this intimate space.

    We’ll dissect various lighting styles, fixture types, and design principles, illuminating the path to creating a minimalist bathroom that is both visually stunning and practically efficient.

    Beyond mere aesthetics, the strategic placement of lighting enhances the functionality of a minimalist bathroom. Proper illumination improves visibility for tasks like applying makeup or shaving, while strategically dimmed lighting fosters relaxation during a soothing bath. The interplay of light and shadow, carefully orchestrated, can subtly accentuate architectural features and create a sense of depth and spaciousness, even in smaller bathrooms.

    Understanding the principles of light and how they interact with space and materials is key to achieving a successful minimalist design.

    Defining Minimalist Bathroom Lighting Styles

    Minimalist bathroom lighting

    Minimalist bathroom lighting prioritizes functionality and clean aesthetics, eschewing superfluous ornamentation for a sense of calm and spaciousness. The choice of lighting style significantly impacts the overall mood and perceived size of the bathroom, influencing both its practicality and visual appeal. Careful consideration of fixture type, placement, and light color temperature is crucial to achieving the desired minimalist effect.

    Recessed Lighting: A Subtle Approach

    Recessed lighting, also known as downlights, offers a clean and unobtrusive solution for minimalist bathrooms. These fixtures are installed directly into the ceiling, leaving only a small aperture visible. Their minimalist design allows them to seamlessly integrate into the ceiling plane, avoiding visual clutter. The visual impact is one of understated elegance. For instance, a bathroom with a white ceiling might incorporate several small, round recessed lights with a cool white (5000K-6500K) light temperature to create a bright, functional space.

    This approach works particularly well in smaller bathrooms where prominent fixtures might overwhelm the space. Materials typically include brushed aluminum or white finishes, complementing contemporary designs. In contrast to pendant or vanity lights, recessed lighting provides even illumination across the ceiling, minimizing shadows and maximizing the feeling of openness.

    Linear Lighting: A Modern Accent

    Linear lighting fixtures, characterized by their elongated and streamlined shapes, add a contemporary edge to minimalist bathroom design. These fixtures can be installed as ceiling lights or as under-cabinet lighting, offering versatility in application. The visual impact is one of sleek sophistication. Imagine a long, thin LED strip light affixed to the underside of a floating vanity, emitting a warm white (2700K-3000K) glow.

    The light’s gentle illumination enhances the vanity area without being overpowering. Materials often include polished chrome or matte black metal, depending on the overall bathroom scheme. This style is particularly effective in larger bathrooms, where the elongated form adds a visual focal point without overwhelming the space. Unlike the diffused light of recessed fixtures, linear lighting can create a more directional light source, useful for highlighting specific areas.

    Pendant Lighting: A Statement Piece

    While seemingly at odds with minimalism, a single, carefully chosen pendant light can serve as a striking focal point in a minimalist bathroom. The key is to select a fixture with simple, clean lines and a muted color palette. The visual impact is one of understated drama. For example, a single, globe-shaped pendant light made of frosted glass, emitting a warm white light, can hang centrally above a freestanding bathtub, creating a spa-like atmosphere.

    The material choice is often glass or matte metal, in neutral colors such as white, black, or brushed nickel. This style works best in larger bathrooms with high ceilings, where the pendant light can be appreciated without feeling cramped. In comparison to recessed or linear lighting, a pendant light offers a more concentrated light source, ideal for accentuating a specific feature within the bathroom.

    Types of Minimalist Lighting Fixtures

    Bathroom contemporary minimalist light design completehome

    Minimalist bathroom lighting design prioritizes functionality and simplicity, eschewing ornamentation for clean lines and efficient illumination. The choice of lighting fixture significantly impacts the overall aesthetic and ambiance. Understanding the various types available allows for a tailored approach that complements the space’s unique characteristics and desired mood.

    Selecting the right lighting fixture involves considering several factors: the size and shape of the bathroom, the color temperature of the light, the material of the fixture, and its compatibility with the overall design scheme. The interplay of these elements creates a harmonious and functional lighting solution.

    Minimalist Bathroom Lighting Fixture Types

    The following table Artikels five common minimalist lighting fixture types, highlighting their material, light color temperature options, and suitability for different bathroom styles.

    Fixture Type Material Light Color Temperature Options (Kelvin) Suitable Bathroom Style
    Recessed Lighting Aluminum, Brushed Nickel, White 2700K (Warm White)

    5000K (Cool White)

    Modern, Contemporary, Minimalist
    Pendant Lights Glass, Metal (Brass, Chrome, Black), Concrete 2700K – 5000K Modern, Industrial, Scandinavian
    Vanity Lights Brushed Nickel, Chrome, Matte Black 3000K (Soft White)

    4000K (Neutral White)

    Traditional, Modern, Transitional
    Wall Sconces Glass, Metal (Brass, Chrome), Wood 2700K – 5000K Traditional, Modern, Contemporary
    LED Strip Lights Plastic, Aluminum 2700K – 6500K (Daylight) Modern, Contemporary, High-Tech

    Advantages and Disadvantages of Specific Fixture Types

    Each lighting fixture type offers unique advantages and disadvantages within a minimalist bathroom context. Careful consideration of these factors ensures optimal functionality and aesthetic harmony.

    Recessed Lighting: Recessed lights offer even, ambient illumination, maximizing space and minimizing visual clutter. However, installation can be more complex and requires sufficient ceiling height. Their minimalist design integrates seamlessly into modern spaces. A disadvantage is the potential for glare if not properly shielded.

    Pendant Lights: Pendant lights provide a focal point, often used above a freestanding tub or vanity. They offer adjustable height and a range of styles, allowing for personalized design expression. However, they might be unsuitable for bathrooms with low ceilings and can cast shadows if not strategically positioned.

    Vanity Lights: Vanity lights offer task lighting for applying makeup or shaving, ensuring optimal visibility. Their placement directly above the mirror minimizes shadows. However, overly bright or poorly designed vanity lights can create glare and detract from the overall minimalist aesthetic.

    Example Minimalist Bathroom Lighting Scheme

    A well-designed minimalist bathroom lighting scheme utilizes a combination of fixture types to achieve layered illumination, enhancing both functionality and ambiance. This example demonstrates such a scheme.

    This scheme incorporates recessed lighting for general illumination, providing a soft, even light throughout the bathroom. The recessed lights are strategically placed to avoid glare and create a calming atmosphere. To add a focal point and task lighting, a single pendant light is installed above the freestanding bathtub. The pendant light is chosen for its simple design and soft, warm light.

    Finally, sleek, minimalist vanity lights are mounted on either side of the mirror, offering focused task lighting without compromising the overall aesthetic. This layered approach provides ambient, task, and accent lighting, creating a versatile and functional space.

    Impact of Light Color Temperature and Brightness

    The human visual system is remarkably sensitive to variations in light, impacting not only our ability to see but also our mood, alertness, and overall perception of a space. In the context of minimalist bathroom design, the strategic application of light color temperature and brightness is paramount to creating an environment that is both functional and aesthetically pleasing. The interplay between these two factors profoundly influences the atmosphere, transforming a simple bathroom into a sanctuary or a vibrant, energizing space.Light color temperature, measured in Kelvin (K), determines the perceived “warmth” or “coolness” of the light.

    Brightness, measured in lumens (lm), dictates the intensity of the light. Understanding these parameters allows for precise control over the bathroom’s ambiance and functionality.

    Color Temperature’s Influence on Mood and Ambiance

    Different color temperatures evoke distinct emotional responses. Warm white light (2700-3000K), often associated with incandescent bulbs, projects a cozy, inviting atmosphere. This is ideal for relaxation and creating a spa-like experience in a minimalist bathroom. The soft, yellowish hue promotes calmness and can even help to mask minor imperfections in the room’s design. Conversely, cool white light (5000-6500K), similar to daylight, provides a more invigorating and focused environment.

    This is better suited for tasks requiring higher levels of concentration, such as applying makeup or shaving. Daylight (5000-6500K) mimics natural sunlight, offering a bright, clean feel, suitable for a minimalist aesthetic that emphasizes cleanliness and openness. Choosing between warm and cool light depends entirely on the desired mood and the primary function of the space. For instance, a minimalist bathroom designed for relaxation might prioritize warm white lighting above the vanity and a cool white light source in the shower area for visibility.

    Brightness Levels and Their Functional and Aesthetic Impact

    Brightness levels directly impact both the functionality and the aesthetic appeal of a minimalist bathroom. Insufficient lighting can hinder tasks like applying makeup or showering safely, while excessive brightness can feel harsh and sterile. Appropriate lumen levels vary depending on the area: a vanity area might require 300-500 lumens for optimal task lighting, ensuring clear visibility for detailed tasks.

    The shower area should have at least 150-200 lumens for safety, avoiding harsh shadows. Ambient lighting, which contributes to the overall atmosphere, can range from 50-100 lumens, creating a softly illuminated background. The use of dimmers allows for adjustable brightness, offering versatility to suit different times of day and moods. A dimmer switch on a warm white light above the bath, for instance, can transition the space from a bright, functional area to a relaxing, dimly lit oasis.

    Balancing Brightness and Color Temperature for a Relaxing Yet Functional Space

    Achieving a harmonious balance between brightness and color temperature is crucial for creating a minimalist bathroom that is both relaxing and functional. This involves a layered approach to lighting, incorporating multiple light sources with varying color temperatures and brightness levels. For example, incorporating recessed warm white downlights for ambient lighting can provide a gentle, welcoming glow. This could be complemented by brighter, cool white task lighting above the vanity and within the shower enclosure.

    The use of dimmers allows for personalized adjustment, enabling users to fine-tune the lighting to suit their needs and preferences throughout the day. This layered approach allows for a dynamic environment that seamlessly transitions between functional and relaxing modes. A thoughtfully designed minimalist bathroom lighting scheme uses light to enhance the clean lines and uncluttered aesthetic, making it a space that is both visually appealing and highly functional.

    Integrating Minimalist Lighting with Bathroom Design Elements

    Minimalist bathroom lighting

    Minimalist lighting, characterized by its clean lines, subtle presence, and functional brilliance, seamlessly integrates with various bathroom design elements to create a harmonious and aesthetically pleasing space. The interplay of light and form enhances the overall design, transforming a functional room into a sanctuary of calm and sophistication. This synergy is achieved through careful consideration of light placement, intensity, and color temperature, all working in concert with the chosen bathroom fixtures and color palette.The strategic placement of minimalist lighting fixtures can dramatically alter the perception of space and enhance the visual appeal of key design elements.

    For instance, strategically positioned LED strip lighting beneath a minimalist vanity subtly illuminates the countertop, highlighting its sleek lines and creating a sense of spaciousness. Similarly, recessed lighting above a walk-in shower can accentuate the clean geometry of the enclosure, casting a soft glow that enhances the overall sense of serenity. The interplay between light and shadow becomes a design element in itself, sculpting the space and directing the eye.

    Minimalist Lighting and Bathroom Design Element Synergy

    The successful integration of minimalist lighting hinges on its ability to complement, not compete with, the existing design elements. A minimalist vanity, often characterized by its clean lines and lack of ornamentation, benefits from understated lighting that avoids overshadowing its inherent elegance. Recessed lighting or a single, elegantly designed pendant light above the vanity provides sufficient illumination without visual clutter.

    Similarly, sleek shower enclosures, typically constructed from glass or minimalist tiling, are enhanced by subtle backlighting or integrated LED strips that subtly illuminate the enclosure’s edges, creating a spa-like atmosphere. Neutral color palettes, frequently employed in minimalist bathrooms, provide a blank canvas for lighting to work its magic. Warm-toned lighting can add warmth and coziness to a predominantly white or beige space, while cooler tones can create a feeling of openness and cleanliness.

    The key is balance; the lighting should enhance the existing aesthetic, not clash with it.

    Key Design Principles for Minimalist Bathroom Lighting

    Understanding key design principles is crucial for achieving a cohesive and aesthetically pleasing minimalist bathroom. The following principles ensure that the lighting scheme complements the overall design, creating a harmonious and functional space.

    • Prioritize Functionality: Adequate illumination for all tasks, from applying makeup to showering, is paramount. While minimalist, the lighting must be functional.
    • Embrace Simplicity: Avoid overly ornate or complex fixtures. Clean lines and simple shapes are key to maintaining the minimalist aesthetic.
    • Layer Lighting: Combine ambient, task, and accent lighting to create depth and visual interest. This layering avoids harsh shadows and provides flexible illumination for different activities.
    • Consider Color Temperature: Warm white light (2700-3000K) creates a relaxing atmosphere, while cool white light (5000-6500K) provides a brighter, more energizing feel. Choose the temperature that best suits the overall mood.
    • Integrate with Materials: Choose fixtures that complement the bathroom’s materials, such as chrome, brushed nickel, or matte black, to create a cohesive look.

    Visual Description of a Minimalist Bathroom

    Imagine a bathroom bathed in soft, warm white light (approximately 3000K). The walls are clad in large, off-white tiles, creating a sense of spaciousness. A minimalist vanity, featuring a sleek, white countertop and a single, integrated sink, sits beneath a single, slender pendant light made of brushed nickel. The light casts a gentle glow, highlighting the clean lines of the vanity and reflecting softly off the countertop.

    A walk-in shower, enclosed by frameless glass, is subtly illuminated by LED strip lighting integrated into the ceiling above the showerhead. This creates a soft, diffused light that avoids harsh shadows and enhances the shower’s clean lines. The overall atmosphere is one of calm, serenity, and understated elegance – a space designed for relaxation and rejuvenation. The lighting plays a crucial role in establishing this mood, its subtle presence enhancing rather than dominating the overall design.

    Practical Considerations for Minimalist Bathroom Lighting

    Bathroom minimalist modern designs millennial source

    Minimalist bathroom lighting, while aesthetically pleasing, presents unique challenges due to the inherent nature of bathroom environments. The combination of limited space, high humidity, and the need for both task and ambient lighting requires careful planning and selection of fixtures to ensure both functionality and longevity. Overcoming these challenges involves a thoughtful approach to fixture selection, installation, and maintenance.

    The small size of many bathrooms often restricts the number and types of light fixtures that can be installed. Furthermore, the presence of moisture necessitates the use of fixtures specifically designed for damp or wet locations, as defined by Ingress Protection (IP) ratings. Finally, energy efficiency is paramount, not only to reduce environmental impact but also to keep operating costs low.

    Addressing these concerns demands a holistic approach that integrates design aesthetics with practical considerations.

    Space Optimization Strategies for Minimalist Bathroom Lighting

    Limited space in many bathrooms often necessitates creative solutions for lighting placement. Recessed lighting, for instance, maximizes space by integrating fixtures directly into the ceiling, minimizing visual clutter. Similarly, strategically placed sconces can provide ambient lighting while also serving as decorative elements. Mirrors with integrated lighting offer a dual-purpose solution, providing both task lighting and a minimalist aesthetic.

    In smaller bathrooms, a single, well-placed pendant light can provide sufficient illumination without overwhelming the space. Careful consideration of the room’s dimensions and the placement of other fixtures is crucial to optimize the lighting design for maximum impact and minimal visual interference.

    Moisture Resistance and IP Ratings in Bathroom Lighting

    Bathrooms are inherently humid environments, making the selection of moisture-resistant lighting fixtures crucial. The Ingress Protection (IP) rating system classifies the degree of protection provided by electrical enclosures against intrusion by solid objects and liquids. For bathroom lighting, fixtures with at least an IP44 rating are recommended, indicating protection against splashing water from any direction. For areas with higher risk of water exposure, such as above showers, fixtures with an IP65 rating or higher, offering protection against water jets, are necessary.

    Ignoring these ratings can lead to short circuits, electrical hazards, and premature fixture failure. Choosing fixtures with appropriate IP ratings is a fundamental aspect of safe and reliable bathroom lighting.

    Energy-Efficient Minimalist Lighting Solutions

    Energy efficiency is a key consideration in modern bathroom design. LED lighting offers a compelling solution, consuming significantly less energy than incandescent or halogen bulbs while providing comparable or superior brightness. LEDs also boast a longer lifespan, reducing the frequency of bulb replacements and minimizing maintenance. Furthermore, advancements in LED technology have resulted in a wider range of color temperatures and light distributions, allowing for greater flexibility in achieving the desired minimalist aesthetic.

    Investing in energy-efficient LED lighting not only reduces environmental impact and utility bills but also contributes to the longevity and sustainability of the bathroom’s lighting system.

    Proper Installation and Maintenance of Minimalist Bathroom Lighting

    Correct installation is paramount to ensure both the safety and longevity of minimalist bathroom lighting fixtures. All electrical work should be undertaken by a qualified electrician to comply with local building codes and safety regulations. This includes ensuring proper wiring, grounding, and the use of appropriate junction boxes and connectors. Regular maintenance, such as cleaning fixtures to prevent dust buildup and checking for any signs of damage or malfunction, is also essential.

    Early detection and resolution of issues can prevent more extensive and costly repairs in the future. A well-maintained lighting system will not only enhance the aesthetic appeal of the bathroom but also contribute to its safety and functionality for years to come.

    Ending Remarks

    In conclusion, minimalist bathroom lighting is more than just the placement of fixtures; it’s a carefully considered design strategy that enhances both the aesthetic appeal and practical functionality of the space. By understanding the interplay of light color temperature, brightness levels, and fixture selection, homeowners can transform their bathrooms into tranquil oases of calm. The key lies in balancing form and function, creating a harmonious blend of style and practicality that reflects personal preferences while adhering to the core principles of minimalist design.

    The result is a bathroom that is not only visually striking but also a haven of serenity and efficiency.

    FAQ Guide

    What is the best lumen output for a minimalist bathroom?

    The ideal lumen output depends on the bathroom’s size and intended use. A smaller bathroom might require 500-750 lumens, while a larger one may need 1000-1500 lumens. Consider using dimmer switches for adjustable brightness.

    Are LED lights the best choice for a minimalist bathroom?

    Yes, LEDs are generally preferred for their energy efficiency, long lifespan, and various color temperature options, aligning perfectly with minimalist design principles emphasizing sustainability and functionality.

    How do I prevent moisture damage to my minimalist lighting fixtures?

    Choose fixtures with an IP rating (Ingress Protection) suitable for damp or wet locations. Proper ventilation and regular cleaning also help prevent moisture buildup.

    Can I use smart lighting in a minimalist bathroom?

    Absolutely! Smart lighting allows for customizable color temperatures, brightness levels, and even automated schedules, adding a layer of convenience and control to the minimalist aesthetic.

    What are some affordable minimalist lighting options?

    Many retailers offer affordable LED strip lights, recessed downlights, and simple pendant lights that achieve a minimalist look without breaking the bank. Consider online marketplaces and discount stores for budget-friendly options.

  • Elegant Minimalist Bathroom Design A Guide

    Elegant Minimalist Bathroom Design A Guide

    The pursuit of an elegant minimalist bathroom transcends mere aesthetics; it’s a journey into creating a sanctuary of calm and efficiency. This design philosophy, characterized by its intentional simplicity and refined details, prioritizes functionality and visual serenity. By carefully selecting materials, colors, and fixtures, we can transform a bathroom into a space that promotes relaxation and well-being, a haven from the everyday chaos.

    This exploration delves into the core principles of minimalist bathroom design, examining how to achieve elegance through thoughtful curation of space, color palettes, and fixtures. We will analyze various minimalist styles, from the clean lines of Scandinavian design to the serene simplicity of Japanese aesthetics. The discussion will cover practical strategies for space optimization in even the smallest bathrooms, emphasizing efficient storage solutions and the crucial role of lighting in setting the mood.

    Ultimately, the goal is to provide a comprehensive guide to crafting a truly elegant and minimalist bathroom, a space that is both beautiful and functional.

    Defining “Elegant Minimalist Bathroom Design”

    Bathroom minimalist design contemporary homedesignboard

    Elegant minimalist bathroom design represents a harmonious blend of functionality and aesthetic simplicity. It prioritizes clean lines, uncluttered spaces, and a carefully curated selection of high-quality materials to create a serene and sophisticated atmosphere. This approach contrasts sharply with overly ornate or cluttered designs, emphasizing instead the inherent beauty of well-chosen elements and their spatial arrangement.

    Minimalist design, at its core, advocates for reducing visual complexity to its essential components. In a bathroom context, this translates to eliminating unnecessary accessories, focusing on streamlined fixtures, and maximizing the sense of space. This isn’t about austerity; rather, it’s about achieving a state of visual calm and order. Elegance, in this context, is achieved through the meticulous selection of materials, the precision of the design, and the incorporation of subtle, luxurious details that elevate the overall experience.

    Core Principles of Minimalist Bathroom Design

    Several key principles underpin elegant minimalist bathroom design. First is the principle of functionality: every element must serve a purpose. Clutter is actively avoided, with storage solutions integrated seamlessly into the design. Second is the emphasis on negative space: the empty areas around objects are just as important as the objects themselves, contributing to the feeling of spaciousness and calm.

    Third is the use of a limited color palette, often featuring neutral tones like white, gray, beige, or muted pastels, to create a unified and soothing environment. Finally, natural light is maximized wherever possible, enhancing the sense of openness and airiness.

    Incorporating Elegance into Minimalist Bathroom Aesthetics

    Elegance in minimalist bathroom design isn’t about ostentation; it’s about refinement. It’s achieved through the careful selection of high-quality materials with inherent beauty. Subtle textural contrasts, such as the interplay of matte and polished surfaces, can add visual interest without compromising the overall sense of simplicity. Well-placed lighting, perhaps featuring a statement pendant light or strategically placed recessed lighting, can dramatically enhance the mood and highlight architectural features.

    Finally, the incorporation of natural elements, such as plants or natural stone, can bring a touch of organic warmth to the space.

    Materials Commonly Used in Elegant Minimalist Bathroom Designs

    The materials chosen significantly impact the overall aesthetic. High-quality materials are essential for achieving an elegant feel. Common choices include:

    • Natural Stone: Marble, granite, and travertine bring a sense of timeless luxury and visual texture.
    • High-gloss Ceramics: Sleek, polished ceramic tiles create a modern and sophisticated look.
    • Solid Surface Materials: Corian or similar materials offer seamless surfaces and easy maintenance.
    • Wood: Water-resistant woods like teak or bamboo can add warmth and visual interest, often used in vanity units or shelving.
    • Metal Accents: Brushed nickel, chrome, or matte black fixtures provide a sophisticated contrast.

    Comparison of Minimalist Bathroom Styles

    While sharing core minimalist principles, different styles offer unique interpretations.

    Style Color Palette Materials Key Features
    Scandinavian Whites, light grays, natural wood tones Wood, light-colored stone, simple ceramics Functionality, natural light, simple lines
    Japanese Neutral tones, natural materials Bamboo, stone, paper, natural fabrics Tranquility, natural elements, clean lines, minimalism
    Industrial Grays, blacks, metallic accents Concrete, metal, exposed pipes Raw materials, exposed structure, vintage elements

    Color Palettes and Material Choices

    Bathroom minimalist ideas small design white room instagram via inspiration organization

    The creation of an elegant minimalist bathroom hinges on a carefully curated selection of colors and materials. These choices, far from being arbitrary, directly impact the perceived spaciousness, tranquility, and overall aesthetic of the room. The interplay of color psychology and material properties dictates the final mood and functionality.Color palettes for minimalist bathrooms often prioritize a sense of calm and spaciousness.

    Neutrals are key, but their effective use extends beyond simply choosing “beige.” The strategic application of varying shades and textures within a limited color range is crucial for creating visual interest without sacrificing the minimalist ethos. The selection of materials, in turn, interacts with the chosen colors, influencing light reflection and overall tactile experience.

    Effective Color Palettes for Elegant Minimalist Bathrooms

    Neutral palettes, predominantly featuring whites, greys, and beiges, form the bedrock of elegant minimalist bathroom design. However, the subtlety lies in the nuances. Warm whites, like #FAF0E6 (linen), offer a soft, inviting feel, while cooler whites, such as #FFFFFF (pure white), contribute to a sense of spaciousness and cleanliness. Subtle grey tones, ranging from light grey (#D3D3D3) to a deeper charcoal (#36454F), add depth and sophistication.

    The incorporation of beige, such as #F5F5DC (beige), introduces warmth and a touch of natural earthiness. These subtle variations within a limited palette prevent monotony and add complexity.

    Impact of Textures on Aesthetic

    Texture plays a pivotal role in elevating a minimalist bathroom beyond mere simplicity. Matte finishes, such as matte black fixtures or matte white tiles, offer a sophisticated, understated elegance. They absorb light, creating a calmer atmosphere compared to their glossy counterparts. Glossy surfaces, on the other hand, reflect light, increasing the perceived size of the space and adding a touch of modern luxury, particularly effective with white or light-colored tiles.

    Natural wood, with its inherent organic texture, introduces warmth and a sense of grounding, contrasting beautifully with the sleekness of other materials. The contrast between matte and gloss, or smooth surfaces and the natural grain of wood, enhances the visual appeal.

    Incorporating Natural Elements

    Natural materials, such as stone and wood, are integral to achieving an elegant and calming atmosphere in a minimalist bathroom. Natural stone, such as marble or travertine, introduces luxurious texture and veining, adding visual interest without overwhelming the minimalist design. The cool tones of marble, for example, can beautifully complement a neutral color palette. Wood, particularly lighter woods like oak or ash, introduces warmth and a tactile element.

    Its natural grain adds visual interest, providing a subtle contrast against smoother surfaces. Using wood sparingly, perhaps for a vanity or shelving, prevents the design from feeling cluttered.

    Example Color Palette with Hexadecimal Codes

    This palette aims for a serene and sophisticated atmosphere:

    • #F2F2F2: Light Grey – Evokes a sense of calm and spaciousness, acting as a neutral backdrop.
    • #A7A7A7: Medium Grey – Provides subtle contrast and depth, ideal for grout or smaller accent features.
    • #505050: Dark Grey – Used sparingly, for fixtures or framing, to add a touch of modern sophistication.
    • #F5F5DC: Beige – Introduces warmth and a natural element, perhaps in a textured tile or vanity.

    Space Optimization and Functionality

    The essence of a minimalist bathroom lies not only in its aesthetic appeal but also in its efficient use of space. Small bathrooms, often a constraint in modern living, present a unique challenge demanding creative solutions to maximize functionality without compromising on the desired sense of calm and spaciousness. By strategically employing space-saving techniques and thoughtful design choices, even the smallest bathroom can transform into a haven of serenity and practicality.

    Successful space optimization in a minimalist bathroom hinges on a multi-pronged approach that considers storage, lighting, and the overall layout. The principles of minimalism, characterized by clean lines, uncluttered surfaces, and a focus on essential elements, naturally lend themselves to space-saving strategies. Careful selection of fixtures, furniture, and accessories is crucial to achieving this balance between functionality and aesthetic simplicity.

    Efficient Storage Solutions for Minimalist Bathrooms

    The key to maintaining a clutter-free minimalist bathroom lies in intelligent storage. Visible clutter directly contradicts the minimalist ethos. Therefore, integrated storage solutions are paramount. This involves maximizing vertical space and utilizing otherwise unused areas.

    Examples of efficient storage include recessed wall cabinets that blend seamlessly into the design, floating shelves for toiletries and decorative items, and vanities with drawers and ample counter space. A cleverly designed medicine cabinet with mirrored doors can further enhance the illusion of spaciousness while providing ample storage. Consider using slimline storage units that maximize storage capacity within a minimal footprint.

    For example, a narrow, tall cabinet can house towels and linens without overwhelming the room.

    The Importance of Lighting in Creating a Calm and Inviting Atmosphere

    Lighting plays a pivotal role in setting the mood and enhancing the functionality of a minimalist bathroom. Proper lighting is not merely about illumination; it is about creating an atmosphere that promotes relaxation and well-being. The science of light and its impact on mood is well-documented. Studies show that softer, warmer light promotes relaxation, while brighter, cooler light can be more energizing.

    In a minimalist bathroom, layered lighting is ideal. This typically involves a combination of ambient lighting (e.g., recessed ceiling lights providing overall illumination), task lighting (e.g., vanity lights for applying makeup or shaving), and accent lighting (e.g., strategically placed LED strip lights to highlight architectural features or artwork). Natural light, where available, should be maximized. Consider using large, frameless mirrors to reflect and amplify existing light sources, further enhancing the sense of spaciousness.

    The color temperature of the light bulbs should be carefully considered; warmer tones (2700-3000K) generally create a more calming atmosphere than cooler tones (5000-6500K).

    Small Minimalist Bathroom Floor Plan: Space Optimization Strategies

    Effective space planning is fundamental to creating a functional and aesthetically pleasing minimalist bathroom. The following floor plan optimizes space in a small bathroom (approximately 4m x 2m) using a combination of space-saving techniques and minimalist design principles.

    The design prioritizes a clean, uncluttered look, focusing on functionality and visual appeal. Careful consideration has been given to the placement of fixtures and storage solutions to maximize available space and create a sense of openness.

    • Shower Enclosure: A walk-in shower with a glass enclosure maximizes space and creates a sense of openness, avoiding the bulkiness of a traditional shower/bath combination. The glass allows light to penetrate, making the space feel larger.
    • Vanity: A floating vanity with a sleek, minimalist design offers ample storage while maintaining a clean, uncluttered look. The lack of legs creates a sense of spaciousness.
    • Toilet: A wall-hung toilet further contributes to the feeling of openness by minimizing visual clutter on the floor. This also simplifies cleaning.
    • Storage: Recessed wall cabinets above the vanity provide additional storage without compromising floor space. A narrow, tall cabinet can be placed discreetly beside the toilet for storing cleaning supplies.
    • Lighting: Recessed ceiling lights provide ambient lighting, while a vanity light with adjustable brightness ensures adequate task lighting. A small, aesthetically pleasing pendant light adds a touch of elegance and serves as an accent light.

    Fixtures and Fittings

    Bathroom minimalist bathrooms modern white grey ideas design style 3d black interior tiles aesthetic small toilet gray designing decor luxury

    The selection of fixtures and fittings is paramount in achieving an elegant minimalist bathroom design. These elements, often understated yet meticulously chosen, contribute significantly to the overall aesthetic and functionality of the space. The interplay of form, material, and technology defines the success of a minimalist approach, prioritizing both visual appeal and practical efficiency.

    Bathroom Vanity Styles

    The bathroom vanity serves as a central focal point, and its design significantly impacts the overall minimalist aesthetic. A wall-mounted vanity, for instance, maximizes floor space and creates a sense of airiness, characteristic of minimalist design. Its sleek profile minimizes visual clutter, allowing other design elements to shine. Conversely, a freestanding vanity, while offering ample storage, requires careful consideration of its size and form to avoid overwhelming the space.

    A floating vanity, a hybrid approach, provides storage without the bulkiness of a traditional cabinet, offering a balance between functionality and visual lightness. The choice depends on the available space and the desired level of storage. For example, a small, wall-mounted vanity with a minimalist sink would suit a compact bathroom, while a larger, freestanding vanity might be appropriate for a more spacious one.

    Sink and Faucet Selection

    Elegant minimalist sinks often feature clean lines and simple geometric shapes. Integrated sinks, seamlessly incorporated into the countertop, create a unified and uncluttered look. Undermount sinks, while offering a similar effect, require a more complex installation. Materials such as ceramic, porcelain, and matte stone resonate with the minimalist aesthetic, offering both durability and a sophisticated appearance. Faucets should complement the sink’s design, with minimalist styles prioritizing clean lines and lever handles.

    Materials like brushed nickel, chrome, or matte black add a touch of sophistication while maintaining a sense of simplicity. The functionality of the faucet, such as a pull-down sprayer for added convenience, should not compromise its minimalist design.

    Toilet Selection

    The toilet, often overlooked, is a crucial component of the minimalist bathroom. Wall-hung toilets, similar to wall-mounted vanities, maximize floor space and contribute to the clean, uncluttered look. Their sleek profile eliminates the bulk of a traditional toilet, allowing for easier cleaning and a more spacious feel. Choosing a toilet with a concealed cistern further enhances the minimalist aesthetic, creating a seamless and visually appealing design.

    Consideration should be given to the toilet’s functionality, such as dual-flush mechanisms, which contribute to water conservation, a growing concern in modern design.

    Bathroom Lighting Considerations

    Appropriate lighting is crucial in creating the desired ambiance. Recessed lighting provides even illumination without visual clutter, a key principle of minimalist design. LED strip lighting, strategically placed under cabinets or around mirrors, adds a soft, ambient glow while highlighting specific features. Pendant lights, while potentially visually heavier, can be used sparingly to create a focal point, provided their design is appropriately minimalist.

    Avoid overly ornate or brightly colored lighting fixtures. Natural light, when available, should be maximized to create a bright and airy space. The color temperature of the lighting should be considered; cooler tones (5000K-6500K) provide a clean, modern feel, while warmer tones (2700K-3000K) offer a more relaxing atmosphere.

    Five Essential Fixtures for an Elegant Minimalist Bathroom

    The selection of fixtures should prioritize both functionality and aesthetic impact. Here are five essential fixtures that exemplify an elegant minimalist design:

    • Wall-mounted vanity: Its sleek profile maximizes space and minimizes visual clutter.
    • Integrated sink: Seamlessly integrated into the countertop, creating a unified and clean look.
    • Wall-hung toilet with concealed cistern: Maximizes floor space and enhances the minimalist aesthetic.
    • Minimalist faucet with lever handles: Clean lines and simple design complement the overall aesthetic.
    • Recessed lighting: Provides even illumination without visual distractions.

    These fixtures, when carefully selected and integrated, contribute to a cohesive and elegant minimalist bathroom design that is both visually appealing and highly functional.

    Visual Inspiration and Design Examples

    The successful execution of an elegant minimalist bathroom design hinges on a careful consideration of visual elements. Understanding the interplay of light, reflection, and the strategic use of natural elements is crucial in achieving the desired atmosphere of serenity and sophistication. This section explores how specific design choices can contribute to a visually compelling and calming bathroom space.The strategic placement and size of mirrors significantly impact the perceived spaciousness and luminosity of a minimalist bathroom.

    Large Mirrors in Minimalist Bathrooms

    Large mirrors, particularly those extending from floor to ceiling or spanning a significant portion of a wall, create an illusion of increased space. This effect is rooted in the principles of visual perception; the reflection doubles the apparent size of the room, minimizing the feeling of confinement often associated with smaller bathrooms. Furthermore, mirrors maximize the available natural light, brightening the space and enhancing the feeling of openness.

    The reflective surface also contributes to a sense of clean lines and simplicity, aligning perfectly with the minimalist aesthetic. A strategically placed, large mirror can also visually connect different areas of the bathroom, creating a sense of flow and cohesion.

    Incorporating Plants in Minimalist Bathrooms

    Introducing plants into a minimalist bathroom design adds a touch of natural serenity without compromising the clean lines and uncluttered aesthetic. The presence of greenery introduces a calming element, softening the hard surfaces and creating a visual contrast that adds depth. However, the selection of plants must be carefully considered; opting for low-maintenance, moisture-loving varieties that thrive in the humid bathroom environment is essential.

    Small, potted succulents, ferns, or orchids are ideal choices. Their organic shapes and textures provide a visual counterpoint to the geometric lines of the minimalist design, adding a touch of life and vibrancy. Furthermore, studies have shown that indoor plants can improve air quality, further enhancing the well-being of the bathroom user.

    Inspirational Image Examples

    The following descriptions illustrate how different design elements contribute to the overall mood and visual appeal of elegant minimalist bathrooms.

    • Image 1: A monochromatic bathroom featuring a large, rectangular mirror reflecting a clean, white space with a single, sculptural freestanding tub. The overall mood is serene and sophisticated, emphasizing simplicity and elegance. The use of natural light enhances the feeling of spaciousness.
    • Image 2: A small bathroom with dark grey walls and a large walk-in shower, featuring a single, slender potted plant placed on the floor. The limited color palette and simple lines create a modern and minimalist aesthetic. The plant adds a subtle touch of nature, breaking the monotony of the grey.
    • Image 3: A spacious bathroom with white walls and a floating vanity. A large, framed mirror hangs above the vanity, reflecting the clean lines of the design. A large window allows ample natural light to flood the space. The overall mood is bright, airy, and spacious.
    • Image 4: A bathroom featuring a textured stone wall, a minimalist shower with a glass enclosure, and a single, elegant pendant light. The mood is sophisticated and textural, emphasizing natural materials and a sense of calm.
    • Image 5: A bathroom with warm wood accents, including a wooden vanity and a frameless mirror. A few strategically placed candles create a warm and inviting atmosphere. The overall mood is calming and luxurious, blending minimalism with warmth.

    Creating a Mood Board for an Elegant Minimalist Bathroom

    A mood board serves as a visual guide during the design process. It allows for the exploration of different design elements and helps ensure a cohesive and aesthetically pleasing final product.

    • Color Palette: Select a limited number of colors, focusing on neutral tones like white, grey, beige, or muted shades of blue or green. Consider incorporating one accent color for a subtle pop of personality.
    • Materials: Choose natural materials such as marble, wood, stone, or concrete for a sophisticated and textural feel. Opt for sleek, minimalist fixtures and fittings.
    • Lighting: Include images of various lighting options, such as recessed lighting, pendant lights, or natural light from a window. Consider the impact of different lighting on the overall mood.
    • Plants: Include images of low-maintenance plants that would thrive in a bathroom environment. Consider their size and placement within the design.
    • Fixtures and Fittings: Select images of minimalist faucets, showerheads, and vanities that complement the chosen color palette and materials. Pay attention to the shapes and lines of these elements.

    Closing Notes

    Creating an elegant minimalist bathroom is a process of thoughtful selection and careful execution. By understanding the core principles of minimalism—simplicity, functionality, and intentionality—and applying them to the choice of color palettes, materials, fixtures, and lighting, one can achieve a space that is both visually stunning and deeply relaxing. The result is a bathroom that transcends mere utility, becoming a personal sanctuary where the focus is on well-being and the quiet beauty of thoughtful design.

    The journey, as detailed in this guide, is one of balancing form and function, resulting in a space that is both practical and profoundly aesthetically pleasing.

    FAQ Compilation

    What are some sustainable materials for an elegant minimalist bathroom?

    Sustainable materials like bamboo, reclaimed wood, recycled glass tiles, and natural stone contribute to both the aesthetic and environmental responsibility of the design. These choices minimize environmental impact while maintaining the elegant minimalist feel.

    How can I incorporate smart technology into a minimalist bathroom?

    Smart technology can be subtly integrated. Consider smart lighting systems for adjustable ambiance, heated floors for enhanced comfort, and touchless faucets for hygiene and a sleek aesthetic. The key is to ensure that the technology enhances, not detracts from, the minimalist design.

    What is the best type of flooring for a minimalist bathroom?

    Large-format tiles (porcelain or natural stone) in neutral tones create a sense of spaciousness and sophistication. However, the choice depends on the overall aesthetic and budget; other options include polished concrete or engineered wood (with appropriate waterproofing).

    How do I maintain a minimalist bathroom’s cleanliness?

    Minimalist bathrooms, with their clean lines and uncluttered surfaces, are generally easier to maintain. Regular cleaning, focusing on surfaces and fixtures, is key. Decluttering regularly prevents the accumulation of items that can disrupt the minimalist aesthetic and make cleaning more challenging.

    Can I achieve a minimalist look on a budget?

    Yes, a minimalist aesthetic doesn’t necessitate high-end materials. Strategic use of affordable materials like painted walls, simple shelving, and repurposed items can create a stylish and budget-friendly minimalist bathroom. Focus on quality over quantity.

  • Scandinavian Bathroom Design with Marble

    Scandinavian Bathroom Design with Marble

    Imagine a sanctuary of serenity: a Scandinavian bathroom where the cool minimalism of Nordic design meets the luxurious warmth of marble. This harmonious blend creates a space that is both strikingly modern and deeply calming. We’ll explore the principles of Scandinavian design, the versatile applications of marble in this context, and the practical considerations of integrating these seemingly disparate elements into a cohesive and breathtaking whole.

    From selecting the perfect marble type to crafting a lighting scheme that enhances its natural beauty, we’ll delve into the art of creating a Scandinavian marble bathroom that transcends mere functionality, becoming a true haven of relaxation and style.

    This exploration will cover the spectrum of design choices, from color palettes and material selections to fixture styles and lighting strategies. We will analyze the unique properties of various marbles, their impact on the overall aesthetic, and how to effectively incorporate them into different bathroom layouts. Furthermore, we will address potential challenges associated with using marble in a Scandinavian setting and provide practical solutions to ensure both beauty and practicality.

    Defining Scandinavian Style in Bathrooms

    Scandinavian bathroom design, a branch of the broader Scandinavian design aesthetic, prioritizes functionality, minimalism, and a connection with nature. This approach translates into bathrooms that are both aesthetically pleasing and highly practical, emphasizing clean lines, natural light, and a calming atmosphere conducive to relaxation and self-care. The style’s core tenets are rooted in the region’s climate and cultural values, resulting in spaces that are both visually appealing and deeply functional.Scandinavian bathroom design emphasizes the use of light, airy spaces to counteract the long, dark winters common in Scandinavian countries.

    This is achieved through a combination of architectural features, color choices, and material selection, all working in harmony to create a bright and welcoming environment. The style’s inherent simplicity and functionality makes it adaptable to various bathroom sizes and layouts, making it a popular choice for homeowners globally.

    Color Palettes in Scandinavian Bathrooms

    The color palette in Scandinavian bathrooms typically features a restrained selection of neutral and pastel shades. White, off-white, light greys, and muted blues are frequently employed as base colors, providing a sense of spaciousness and cleanliness. These light tones are often complemented by natural wood accents, creating a warm and inviting contrast. The occasional pop of color, such as a deep teal or a soft blush pink, might be introduced through accessories or smaller elements, but these are used sparingly to avoid disrupting the overall sense of calm and serenity.

    This restrained palette reflects the Scandinavian emphasis on simplicity and functionality, allowing the natural light and materials to take center stage.

    Incorporation of Natural Light in Scandinavian Bathrooms

    Natural light is a crucial element in Scandinavian bathroom design. Large windows, skylights, and strategically placed mirrors are often used to maximize the amount of natural light entering the space. This is particularly important during the darker winter months, where natural light is limited. The design prioritizes maximizing the penetration and diffusion of natural light to create a bright and airy atmosphere.

    In situations where natural light is limited, artificial lighting is carefully selected to mimic the soft, diffused quality of natural light, avoiding harsh shadows and maintaining a consistent, comfortable ambiance. This attention to lighting enhances the overall feeling of spaciousness and wellbeing.

    Common Materials in Scandinavian Bathrooms (Besides Marble)

    Beyond marble, several other materials commonly feature in Scandinavian bathroom design. Light-colored wood, particularly oak and pine, is frequently used for vanities, shelving, and flooring, introducing warmth and texture. These natural wood choices often have a light, oiled finish to highlight the grain and maintain a sense of natural beauty. Ceramic tiles, often in white or light grey, are also a popular choice for flooring and wall coverings, offering durability and ease of maintenance.

    These are often selected for their matte finish to further enhance the overall understated elegance of the design. Finally, matte black fixtures and fittings can add a touch of sophistication, providing a subtle contrast against the lighter color palette. The selection of these materials is guided by their durability, ease of maintenance, and ability to contribute to the overall sense of understated elegance.

    Marble’s Role in Scandinavian Bathrooms

    Hygge deepinmummymatters

    The inherent elegance of marble harmoniously complements the minimalist aesthetic of Scandinavian bathroom design. Its natural beauty, durability, and versatility make it a coveted material for creating serene and sophisticated spaces that reflect the region’s appreciation for natural materials and functionality. The interplay of light and texture offered by marble adds a layer of visual interest, elevating the overall design beyond mere practicality.

    Marble Types Suitable for Scandinavian Bathrooms and Their Properties

    Several marble varieties lend themselves particularly well to the Scandinavian aesthetic. Carrara marble, with its characteristic white background and delicate grey veining, embodies the clean lines and understated luxury favoured in Scandinavian design. Its relatively soft texture allows for intricate detailing, while its porous nature requires sealing to maintain its pristine appearance. Calacatta marble, a close relative, offers a brighter white background with bolder, more dramatic veining, adding a touch of opulence without sacrificing the minimalist feel.

    Statuario marble, another popular choice, features a striking white background with subtle grey or gold veining, providing a luxurious yet understated look. Finally, darker marbles like Nero Marquina, with its dramatic black background and intricate white veining, can be used as an accent to create a sophisticated contrast against lighter elements, adding depth and visual interest to the space.

    The choice depends on the desired level of contrast and the overall color palette of the bathroom. Each marble type possesses unique properties regarding hardness, porosity, and maintenance requirements, which should be carefully considered during the selection process.

    Marble Texture and Veining’s Contribution to Aesthetic

    The texture and veining of marble are integral to its visual appeal and its integration into Scandinavian bathroom design. The smooth, cool surface of polished marble provides a tactile experience that enhances the sense of serenity, while honed marble offers a slightly less reflective, matte finish, adding a more rustic touch. The natural veining patterns, unique to each slab, inject a sense of organic artistry, counterbalancing the clean lines of Scandinavian design.

    These variations in color and pattern prevent monotony, adding a touch of personality without disrupting the overall minimalist aesthetic. The veining can be used to create visual interest in specific areas, such as a feature wall or a countertop, while the consistent texture of the material provides a sense of unity throughout the space. The interplay of light and shadow on the marble’s surface further enhances its textural depth, creating a dynamic and engaging visual experience.

    Three Distinct Bathroom Layouts Incorporating Marble in a Scandinavian Style

    The versatility of marble allows for diverse design approaches within a Scandinavian context. Below are three distinct layouts illustrating this versatility.

    Layout Material Dimension (approx.) Description
    Layout 1: Minimalist Serenity Carrara Marble (floor, shower walls, vanity top); White matte cabinetry; Chrome fixtures Floor: 10 sq m; Shower: 2 sq m; Vanity: 1.5 sq m Emphasizes clean lines and a calming atmosphere. The subtle veining of Carrara marble complements the overall minimalist aesthetic.
    Layout 2: Modern Contrast Nero Marquina Marble (feature wall); Calacatta Marble (vanity top); Light oak cabinetry; Black matte fixtures Feature Wall: 3 sq m; Vanity: 1.8 sq m Creates a striking contrast between dark and light elements. The dramatic veining of Nero Marquina adds visual interest, while the Calacatta marble provides a luxurious touch.
    Layout 3: Rustic Elegance Honed Calacatta Marble (floor); Whitewashed wood cabinetry; Brass fixtures; Statuario Marble (accent tiles) Floor: 12 sq m; Accent Tiles: 1 sq m Combines the rustic warmth of wood with the elegance of marble. The honed finish of the Calacatta marble provides a softer, more matte texture.

    Light and Dark Marble in Scandinavian Bathroom Settings: A Comparison

    Light marbles, such as Carrara and Calacatta, are commonly used in Scandinavian bathrooms to maximize natural light and create a sense of spaciousness. Their bright, reflective surfaces enhance the feeling of airiness, crucial in smaller bathrooms. They contribute to a clean, minimalist aesthetic, often complemented by light-colored wood and white fixtures. Dark marbles, like Nero Marquina, offer a stark contrast, adding a dramatic and sophisticated touch.

    Used sparingly, as a feature wall or vanity top, they can add depth and visual interest without overwhelming the space. The choice between light and dark marble depends on the desired ambiance and the size of the bathroom. Light marble is generally preferred for smaller bathrooms to enhance the sense of space, while dark marble can be effectively incorporated in larger spaces to create a more dramatic and luxurious feel.

    Integrating Marble and Scandinavian Elements

    Momooze downstairs

    The inherent elegance of marble presents a fascinating design challenge when paired with the minimalist aesthetic of Scandinavian interiors. Successfully integrating these two seemingly disparate styles requires a careful consideration of texture, color, and the strategic placement of marble elements within the overall design scheme. The goal is to create a space that feels both luxurious and serene, reflecting the core principles of both design philosophies.

    Marble, with its inherent natural variations in veining and color, offers a unique textural contrast to the often smooth, uncluttered surfaces favored in Scandinavian design. This contrast, when carefully managed, can elevate the overall aesthetic, adding depth and visual interest without sacrificing the clean lines and functionality that define Scandinavian style. The key lies in selecting marble types and utilizing design techniques that complement, rather than clash with, the core principles of Scandinavian minimalism.

    Design Ideas Harmonizing Marble and Scandinavian Minimalism

    The following design ideas illustrate the potential for creating a harmonious blend of marble’s luxurious presence and Scandinavian design’s understated elegance. These examples showcase how careful selection and placement can enhance, rather than overwhelm, the overall aesthetic.

    • A freestanding marble bathtub, featuring a simple, rectangular design, becomes a sculptural centerpiece within a minimalist bathroom. The clean lines of the tub are emphasized by the surrounding light-colored walls and simple fixtures.
    • A single, large-format marble tile used as a backsplash behind a minimalist sink creates a striking focal point. The subtle veining of the marble adds a touch of visual interest without overwhelming the space’s clean lines.
    • Marble flooring, in a light neutral shade with minimal veining, provides a luxurious yet understated base for the room. The flooring’s subtle texture adds a touch of warmth without detracting from the overall minimalist feel.
    • A marble countertop, with a honed or matte finish to reduce reflectivity, pairs beautifully with light wood cabinetry. This combination creates a balance between the cool elegance of marble and the warmth of natural wood, a hallmark of Scandinavian design.
    • A marble shower surround, with a simple, frameless glass enclosure, showcases the natural beauty of the stone while maintaining a sense of openness and airiness. The use of a single, large slab of marble minimizes grout lines, contributing to the overall clean aesthetic.

    Marble as a Feature Element in Scandinavian Bathrooms

    Marble’s versatility allows for its strategic use as a feature element in various ways, enhancing the bathroom’s overall design. Its natural beauty and durability make it an ideal choice for high-traffic areas.

    For example, a marble countertop provides a luxurious and durable surface for a bathroom vanity. The cool tones of marble complement the often light and airy color palettes of Scandinavian bathrooms. Similarly, marble flooring adds a touch of elegance while maintaining practicality. Its durability makes it suitable for high-moisture environments. Finally, a marble shower surround creates a spa-like atmosphere, enhancing the bathroom’s overall luxurious feel.

    Challenges and Solutions in Using Marble in Scandinavian Bathrooms

    While marble is a beautiful and durable material, its use in Scandinavian bathrooms presents some potential challenges. Understanding and addressing these challenges is crucial for a successful integration.

    One major challenge is the potential for marble’s inherent elegance to clash with the minimalist aesthetic. This can be mitigated by choosing marble with subtle veining and a light color palette. Additionally, using a honed or matte finish can reduce reflectivity, making the marble appear less ostentatious. Another challenge is the porosity of marble, which makes it susceptible to staining.

    This can be addressed by sealing the marble properly before installation and regularly cleaning it with a pH-neutral cleaner. Finally, the cost of marble can be a significant factor. Consider using marble strategically as a feature element, rather than covering entire surfaces, to manage costs effectively.

    Balancing Marble’s Elegance and Scandinavian Simplicity

    The key to successfully integrating marble into a Scandinavian bathroom lies in balancing its inherent elegance with the simplicity of the overall design. This involves careful selection of the marble itself – opting for lighter colors and subtle veining – and strategic placement within the room. By limiting the use of marble to key areas, such as the countertop or a single feature wall, the overall aesthetic remains clean and uncluttered, while still incorporating the luxurious touch of marble.

    The contrast between the cool tones of the marble and the warmth of natural wood elements, such as a vanity or shelving, further enhances the balance and creates a sophisticated and harmonious space.

    Lighting and Fixtures in a Marble Scandinavian Bathroom

    The interplay of light and material is paramount in a Scandinavian bathroom featuring marble. The cool, often subtly veined nature of marble demands a lighting scheme that both highlights its inherent beauty and complements the overall minimalist aesthetic. Careful fixture selection is crucial, ensuring functionality and design cohesion within the space.The ideal lighting scheme for a marble Scandinavian bathroom layers ambient, task, and accent lighting to create a balanced and inviting atmosphere.

    Ambient lighting provides overall illumination, preventing harsh shadows and creating a sense of spaciousness. Task lighting, focused on specific areas like the vanity and shower, ensures practicality. Accent lighting strategically highlights the marble’s texture and veining, adding depth and visual interest. The use of natural light, maximized through large windows and skylights, should be prioritized where possible, forming the foundation of the lighting design.

    This approach mirrors the Scandinavian emphasis on natural light and its positive effects on well-being.

    Ambient Lighting in Marble Scandinavian Bathrooms

    Ambient lighting should be soft and diffused, minimizing harsh contrasts. Recessed lighting, integrated into the ceiling, provides even illumination without visual clutter. Consider using LED panels with adjustable color temperature, allowing for a shift from warmer tones in the evening to cooler, brighter light during the day. This adaptability caters to the changing needs and moods throughout the day, enhancing the overall bathroom experience.

    The subtle glow from these fixtures will softly illuminate the marble, showcasing its subtle nuances without overpowering the material.

    Task Lighting Solutions for Marble Scandinavian Bathrooms

    Task lighting focuses functionality, primarily illuminating the vanity area and shower. For the vanity, consider wall-mounted sconces with adjustable arms, providing focused light for grooming and makeup application without casting shadows. These should be sleek and minimalist, echoing the Scandinavian design principles. In the shower, waterproof recessed lights or a combination of ceiling-mounted and showerhead-integrated lights ensure safe and effective illumination.

    The choice should be guided by the shower’s size and configuration, ensuring even light distribution across the space.

    Accent Lighting to Enhance Marble Features

    Accent lighting serves to highlight the unique character of the marble. This can be achieved using strategically placed LED strip lights behind or beneath marble shelves, vanity countertops, or within niches. The warm, subtle glow of these lights will accentuate the marble’s texture and veining, adding depth and visual interest. The color temperature of the accent lighting should complement the marble’s color palette; cooler tones work well with lighter marbles, while warmer tones might suit darker varieties.

    Suitable Bathroom Fixtures for a Scandinavian Marble Bathroom

    The fixtures selected should complement the marble’s elegance and the overall minimalist aesthetic. Undermounted sinks, crafted from materials like matte white ceramic or durable resin, create a seamless and uncluttered look, maximizing the visual impact of the marble countertop. Sleek, minimalist faucets, preferably in brushed nickel or matte black, provide a striking contrast against the marble’s lighter tones.

    Wall-mounted toilets further contribute to the clean lines and spacious feel of the Scandinavian design. These fixtures are chosen for their durability, ease of cleaning, and visual appeal, reflecting the practical yet sophisticated nature of Scandinavian design.

    Examples of Lighting Fixture Styles for a Marble Scandinavian Bathroom

    The selection of lighting fixtures is critical in achieving the desired atmosphere. The following styles exemplify appropriate choices:

    • Recessed LED Downlights: These provide even, diffused ambient lighting, ideal for general illumination.
    • Linear LED Strip Lights: Perfect for accent lighting, highlighting marble features and creating a sense of depth.
    • Wall-Mounted Sconces with Adjustable Arms: Offer focused task lighting for the vanity area.
    • Pendant Lights with Matte White or Black Shades: These provide a stylish focal point while maintaining the minimalist aesthetic.
    • Waterproof LED Shower Lights: Essential for safe and effective illumination within the shower enclosure.

    Selecting Lighting Fixtures to Enhance Marble Texture and Color

    The color temperature and intensity of the lighting should be carefully considered to enhance the marble’s inherent beauty. Warmer color temperatures (2700K-3000K) can create a cozy and inviting atmosphere, particularly suitable for darker marbles. Cooler color temperatures (4000K-5000K) provide a brighter, more invigorating feel, ideal for lighter marbles. The intensity of the light should be carefully balanced; too much light can wash out the marble’s subtle nuances, while too little can create an uninviting atmosphere.

    Experimentation with different color temperatures and intensities is crucial to find the optimal balance that best showcases the marble’s unique characteristics. Consider the size and scale of the bathroom as well, ensuring that the lighting is appropriately scaled to the space. For example, a smaller bathroom might benefit from fewer, more strategically placed fixtures, while a larger bathroom might require a more comprehensive lighting scheme.

    Visual Representation of Design Concepts

    The following sections provide detailed visual descriptions of Scandinavian bathroom designs incorporating marble, focusing on specific applications and the interplay of materials and textures. These descriptions aim to illustrate the aesthetic and practical considerations involved in integrating marble into a Scandinavian bathroom setting. Emphasis is placed on conveying the visual impact through detailed descriptions rather than relying on visual media.

    Scandinavian Bathroom with Marble Flooring

    This design envisions a bathroom measuring 4m x 3m (approximately 13ft x 10ft). The flooring consists of large-format, light-grey Calacatta marble slabs, each measuring 1.2m x 1.2m (approximately 4ft x 4ft). The slabs are laid in a simple, running bond pattern to emphasize the natural veining of the marble. The polished finish enhances the luminosity of the stone, reflecting light and creating a sense of spaciousness.

    The grout lines are minimal and a near-invisible off-white, minimizing visual disruption. Underfloor heating is incorporated for enhanced comfort and to mitigate the inherent coolness of marble. The walls are painted in a soft, warm white, creating a harmonious contrast with the cool tones of the marble.

    Scandinavian Bathroom with Marble Shower Surround

    A walk-in shower occupies one corner of the bathroom. The shower surround is crafted from honed Cararra marble, selected for its subtle veining and matte finish. The honed texture offers a tactile contrast to the polished marble floor, providing a sense of understated luxury. The marble tiles are smaller than the floor tiles, approximately 30cm x 30cm (approximately 12in x 12in), allowing for greater flexibility in layout and accommodating the shower’s corner placement.

    The shower walls are finished with a consistent, uninterrupted expanse of marble, contributing to a clean and minimalist aesthetic. The overall color palette remains light and airy, with the cool white of the Cararra marble complementing the warmer white of the bathroom walls.

    Visual Impact of Different Marble Finishes

    The choice of marble finish significantly impacts the overall visual perception of a Scandinavian bathroom. A polished finish, as seen in the flooring example, maximizes light reflection, creating a brighter and more expansive feel. This is particularly beneficial in smaller bathrooms. In contrast, a honed finish, as in the shower surround example, offers a softer, more subdued aesthetic.

    The matte surface reduces glare and creates a more tactile experience, lending a sense of calmness and serenity. A leather-finished marble would introduce a more textured and rustic element, potentially contrasting with the sleek lines of Scandinavian design, though it could be successfully incorporated with careful consideration of other design choices. The subtle variations in light reflection and texture significantly influence the room’s mood and atmosphere.

    Scandinavian Bathroom with Marble Vanity Tops and Wooden Cabinetry

    The bathroom features a floating vanity with a countertop crafted from a creamy, light-beige marble, such as Crema Marfil. The marble’s warm tones provide a gentle contrast to the cool grey of the flooring. The vanity unit itself is constructed from light oak wood, its natural grain adding warmth and texture. The combination of the smooth, cool marble and the warm, textured wood creates a visually appealing interplay of materials.

    The contrast between the smooth surface of the marble and the subtle grain of the wood creates a balanced and sophisticated aesthetic. The matte finish of the marble complements the natural finish of the wood, avoiding any visual competition. The overall effect is one of understated elegance and harmonious contrast, reflective of Scandinavian design principles.

    Closing Summary

    Wohnung twee soorten patroontegels badkamer nordic fliesen roohome badezimmer voorbeelden badkamers shade white

    The marriage of Scandinavian design’s clean lines and natural light with the opulent elegance of marble results in a bathroom that is both sophisticated and inviting. By carefully considering the interplay of textures, colors, and lighting, one can achieve a space that is uniquely personal and reflects the tranquility and simplicity inherent in Scandinavian aesthetics. The key lies in balancing the inherent luxury of marble with the understated elegance of the Nordic style, creating a bathroom that is both functional and a true expression of refined taste.

    Remember, the details—from the subtle veining of the marble to the carefully chosen fixtures—contribute to the overall harmony and create a space that is both visually stunning and profoundly relaxing.

    FAQ Guide

    What are the typical costs associated with a marble Scandinavian bathroom?

    Costs vary greatly depending on the type and quantity of marble used, the size of the bathroom, and the complexity of the design. High-end marble and custom installations can significantly increase the overall expense.

    How do I maintain a marble Scandinavian bathroom?

    Regular cleaning with a pH-neutral cleaner is crucial. Avoid acidic cleaners that can etch the marble’s surface. Sealing the marble periodically helps protect it from stains and water damage.

    Is marble suitable for all Scandinavian bathroom styles?

    While marble complements many Scandinavian styles, its suitability depends on the specific design aesthetic. It might be less appropriate for extremely minimalist or rustic interpretations.

    Are there eco-friendly marble options for a sustainable Scandinavian bathroom?

    Yes, sourcing marble from companies with sustainable practices and choosing locally sourced materials can minimize the environmental impact. Recycled or reclaimed marble is also an option.

    Can I use marble in a small Scandinavian bathroom?

    Yes, but careful consideration of color and layout is essential. Lighter-colored marbles can create an illusion of spaciousness. Avoid overly busy veining patterns in smaller spaces.

  • Scandinavian Bathroom with Green Plants

    Scandinavian Bathroom with Green Plants

    Imagine stepping into a sanctuary of serenity: a Scandinavian bathroom, where minimalist design meets the vibrant life of lush greenery. This harmonious blend creates a space that is both aesthetically pleasing and scientifically beneficial. The crisp, clean lines characteristic of Scandinavian design provide the perfect backdrop for the calming presence of strategically placed plants, transforming a functional space into a tranquil oasis.

    We will explore how the principles of Scandinavian aesthetics, coupled with the careful selection and placement of plants, can cultivate a bathroom environment that is both beautiful and invigorating.

    This exploration delves into the specifics of plant selection, considering factors such as light requirements, water needs, and toxicity levels to ensure both aesthetic appeal and safety. We’ll examine the role of natural and artificial lighting in enhancing the ambiance, and the importance of material choices—from durable, water-resistant surfaces to the tactile appeal of natural wood and stone—in completing this tranquil design.

    Furthermore, we’ll address practical considerations, offering tips for maintaining a thriving indoor garden in the unique environment of a bathroom.

    Defining the Scandinavian Bathroom Aesthetic

    The Scandinavian bathroom aesthetic, a prominent design trend globally, transcends mere functionality; it embodies a philosophy of minimalist living intertwined with a deep appreciation for nature’s calming influence. This design style prioritizes functionality, simplicity, and the strategic use of natural light and materials to create a space that feels both serene and invigorating. It’s a style that prioritizes well-being and creates a haven for relaxation and rejuvenation.

    Scandinavian design, originating in the Nordic countries, emphasizes practicality and functionality alongside aesthetic appeal. This translates to bathrooms characterized by clean lines, uncluttered surfaces, and a focus on quality materials that age gracefully. The overall effect is a space that feels both sophisticated and effortlessly simple, fostering a sense of calm and tranquility. The inclusion of green plants further enhances this connection to nature, improving air quality and adding a vibrant touch to the minimalist palette.

    Key Characteristics of Scandinavian Bathroom Design

    Scandinavian bathroom design is characterized by several key elements that contribute to its unique aesthetic. These include the prevalent use of light, neutral colors; the incorporation of natural materials like wood and stone; the strategic placement of plants to bring the outdoors in; and a focus on clean lines and minimalist functionality. The absence of clutter is paramount, ensuring a sense of spaciousness and tranquility, even in smaller bathrooms.

    Every element serves a purpose, reflecting a design philosophy rooted in practicality and efficiency.

    Color Palettes in Scandinavian Bathrooms

    The color palettes employed in Scandinavian bathrooms typically feature a range of light and neutral tones, often incorporating shades of white, beige, gray, and soft pastels. These light colors maximize the perception of space and reflect natural light, contributing to the overall feeling of airiness and openness. While white is a dominant color, it’s often paired with subtle accents of other natural hues, such as soft greens, blues, or muted earth tones, to add depth and visual interest without overwhelming the minimalist aesthetic.

    The use of these colors creates a calming and inviting atmosphere, reflecting the Scandinavian emphasis on creating spaces conducive to relaxation and well-being. A deep teal or a muted olive green, for instance, might be used as an accent color on a single wall or in the choice of towels and accessories.

    The Role of Natural Light and Minimalism

    Natural light plays a crucial role in the Scandinavian bathroom aesthetic. Large windows, if possible, are highly desirable, allowing ample sunlight to flood the space. This abundance of natural light not only brightens the room but also enhances the feeling of spaciousness and connection to the outdoors. When natural light is limited, artificial lighting is carefully chosen to mimic the soft, diffused light of a Nordic day.

    This might involve using multiple smaller light sources rather than a single overhead fixture, creating a more ambient and welcoming atmosphere.

    Minimalism is central to the Scandinavian design philosophy. This translates to a focus on essential items only, eliminating unnecessary clutter and maximizing the feeling of spaciousness. Storage solutions are often built-in and discreet, keeping toiletries and other items neatly organized and out of sight. The overall effect is a clean, uncluttered space that feels both serene and functional, promoting a sense of calm and relaxation.

    This approach is not about austerity but about carefully curating a space that promotes well-being and reflects a mindful approach to living.

    Integrating Green Plants into the Design

    The incorporation of green plants within a Scandinavian bathroom design not only enhances its aesthetic appeal but also contributes to a healthier and more invigorating atmosphere. The minimalist ethos of Scandinavian design, characterized by its clean lines and natural materials, finds a harmonious partner in the introduction of carefully selected flora. This symbiotic relationship leverages the inherent benefits of plants while maintaining the design’s core principles.Plant selection for a bathroom environment requires consideration of factors such as light availability, humidity levels, and the potential for toxicity.

    Bathrooms, often lacking in direct sunlight and characterized by high humidity, present a unique set of challenges and opportunities for plant cultivation.

    Suitable Plant Species for Scandinavian Bathrooms

    The following table Artikels several plant species well-suited to the specific conditions of a Scandinavian bathroom, balancing aesthetic appeal with practical considerations of light, water requirements, and toxicity.

    Plant Name Light Requirements Water Needs Toxicity Level
    ZZ Plant (Zamioculcas zamiifolia) Low to medium indirect light Infrequent watering; tolerates drought Non-toxic to humans and pets
    Snake Plant (Sansevieria trifasciata) Low to medium indirect light; tolerates low light Infrequent watering; tolerates drought Non-toxic to humans, but mildly toxic to pets
    Peace Lily (Spathiphyllum wallisii) Low to medium indirect light Regular watering; prefers moist soil Toxic to humans and pets if ingested
    Cast Iron Plant (Aspidistra elatior) Low light; tolerates very low light conditions Infrequent watering; tolerates drought Non-toxic to humans and pets

    Benefits of Incorporating Plants in Bathroom Design

    The inclusion of plants in a bathroom offers several significant advantages. Beyond the obvious aesthetic enhancements, plants contribute to improved air quality. Many species, such as snake plants and ZZ plants, possess the remarkable ability to filter certain airborne toxins, contributing to a cleaner and healthier breathing environment. This air purification process is primarily achieved through the plants’ uptake of volatile organic compounds (VOCs) during photosynthesis.

    Furthermore, the presence of greenery fosters a sense of tranquility and well-being, transforming the bathroom into a more relaxing and spa-like sanctuary. The visual appeal of plants complements the clean lines and natural materials of Scandinavian design, enhancing the overall atmosphere.

    Displaying Plants in a Scandinavian Bathroom

    Several methods exist for seamlessly integrating plants into a Scandinavian bathroom’s design. Hanging planters, suspended from the ceiling or walls, offer a space-saving solution, particularly beneficial in smaller bathrooms. They create a sense of verticality and add visual interest without cluttering floor space. Strategically placed shelves, perhaps made of light-colored wood to complement the overall aesthetic, provide another excellent option for showcasing plants of varying sizes and types.

    Floor plants, chosen for their size and hardiness, can act as focal points, anchoring the design and adding a touch of natural grandeur. For instance, a large, healthy ZZ plant positioned in a corner could serve as a striking centerpiece. The key is to maintain a balance between the plants’ presence and the clean, minimalist design ethos of the Scandinavian style.

    Material Selection and Texture

    Scandinavian bathroom with green plants

    The careful selection of materials is paramount in achieving the serene and functional aesthetic of a Scandinavian bathroom incorporating lush greenery. The chosen materials must not only complement the minimalist design principles but also withstand the humid environment and frequent cleaning associated with a bathroom setting. A successful material palette will balance durability, water resistance, and the tactile appeal of natural textures, creating a harmonious space that feels both luxurious and practical.The inherent characteristics of different materials significantly impact their suitability for a Scandinavian bathroom.

    Porosity, density, and the presence of natural oils or resins all influence a material’s resistance to water damage and mold growth. Furthermore, the aesthetic qualities – color, grain, and texture – contribute to the overall atmosphere, reflecting the principles of Scandinavian design which prioritize natural light and a sense of calm.

    Material Properties and Water Resistance

    A range of materials offer distinct advantages and disadvantages in a high-humidity environment. Natural stone, such as marble or slate, possesses inherent beauty and durability. However, its porosity necessitates sealing to prevent water absorption and staining. Conversely, porcelain tiles offer superior water resistance and are exceptionally durable, capable of withstanding daily wear and tear. Their versatility in terms of color and texture allows for significant design flexibility, mimicking the appearance of natural stone or wood.

    Wood, while undeniably beautiful and contributing to the Scandinavian aesthetic, requires careful selection and treatment. Hardwoods like teak or oak, known for their density and natural oils, offer better water resistance than softer woods. However, even treated hardwoods benefit from the application of water-resistant sealants to minimize the risk of damage. The use of waterproof sealant, in all cases where necessary, is crucial to maintain the longevity and integrity of materials in a bathroom setting.

    Texture and its Contribution to the Scandinavian Aesthetic

    Texture plays a crucial role in creating the calming and inviting atmosphere characteristic of Scandinavian design. The smooth, cool surface of polished stone contrasts beautifully with the warm, organic texture of untreated wood. The subtle grain of a lightly oiled oak countertop or the rough, natural cleft of a slate floor tile creates visual interest and tactile appeal.

    These textural contrasts enhance the overall sensory experience, adding depth and dimension to the space. The incorporation of plants further adds to the textural complexity, with the soft, velvety leaves of some plants providing a counterpoint to the harder surfaces. The careful juxtaposition of materials with varying textures creates a harmonious and visually engaging environment. For instance, the smooth, cool surface of a concrete sink could be balanced by the rough texture of a woven linen towel rack and the soft, rounded forms of potted plants.

    Lighting and Ambiance

    The interplay of light and shadow is paramount in establishing the serene atmosphere of a Scandinavian bathroom, especially when incorporating the vibrancy of green plants. Effective lighting not only illuminates the space but also enhances the textures and colors, creating a calming and invigorating environment. Careful consideration of both natural and artificial light sources is crucial to achieving this balance.Natural light, abundant in Scandinavian design, should be maximized.

    Large windows, if available, should be left unobstructed to allow ample daylight to flood the space. The inherent brightness of natural light complements the minimalist aesthetic and enhances the photosynthetic processes of the plants, promoting their healthy growth. However, reliance solely on natural light is impractical; therefore, a well-thought-out artificial lighting plan is essential.

    Artificial Lighting Strategies for a Scandinavian Bathroom

    A layered lighting approach is recommended, combining ambient, task, and accent lighting to create depth and visual interest. Ambient lighting provides overall illumination, typically achieved through recessed ceiling lights or softly diffused pendant lights. These should emit a warm, soft white light (around 2700-3000 Kelvin) to mimic natural daylight and create a relaxing atmosphere. Task lighting, such as waterproof vanity lights, provides focused illumination for activities like applying makeup or shaving.

    These should be brighter (around 4000 Kelvin) and positioned to avoid harsh shadows. Finally, accent lighting strategically highlights key features, such as the plants or a unique piece of artwork. This can be achieved with small spotlights or LED strip lights subtly integrated into shelving or behind plants. The intensity and color temperature of accent lighting can be adjusted to create different moods, from a vibrant, energizing atmosphere to a calm, spa-like setting.

    Highlighting Plants and Design through Lighting

    The strategic placement of lighting can dramatically enhance the visual impact of the plants and the overall design. Backlighting plants, using LED strip lights positioned behind them, creates a dramatic silhouette effect, highlighting their form and texture against the wall. Downlighting, using spotlights directed downwards, emphasizes the lush greenery, showcasing the details of the leaves and stems. Using warm-toned lighting accentuates the natural colors of the plants, enhancing their vibrancy.

    Conversely, cooler-toned lighting can create a more modern and sophisticated feel. By carefully considering the angle and intensity of the light, the interplay of light and shadow can create a sense of depth and dimension, adding visual interest to the space. The reflection of light on polished surfaces, such as a marble countertop or a chrome faucet, further enhances the overall ambiance.

    Ambient Mood Created by Scandinavian Design and Greenery

    The combination of Scandinavian design principles and the introduction of indoor plants cultivates a unique and calming ambiance. The minimalist aesthetic of Scandinavian design, characterized by clean lines, light colors, and natural materials, provides a serene backdrop for the plants. The plants themselves introduce a sense of life and vitality, softening the starkness of the minimalist style and adding a touch of nature to the otherwise sterile environment.

    The soft, diffused lighting complements this combination, creating a peaceful and inviting space. The overall effect is a bathroom that feels both modern and tranquil, promoting relaxation and well-being. Studies have shown that exposure to natural elements, such as plants and natural light, can reduce stress levels and improve mood, making this design particularly conducive to a calming and rejuvenating bathroom experience.

    Visual Representation

    Scandinavian bathroom with green plants

    A Scandinavian bathroom, infused with the vibrancy of green plants, presents a unique interplay of light and shadow, creating a serene and invigorating space. The design leverages the principles of biophilic design, seamlessly integrating nature into the minimalist aesthetic. The careful selection of materials and the strategic placement of plants amplify the natural light, casting soft shadows that add depth and texture to the overall design.The interplay of light and shadow is crucial in highlighting the textures and colors within the space.

    Natural light, diffused through sheer curtains or a frosted glass window, creates a soft, even illumination. This soft light accentuates the subtle textures of the materials, such as the smooth surface of a matte white tile, the grainy texture of light wood, and the velvety leaves of the plants. Conversely, strategically placed spotlights or pendant lights cast focused beams, highlighting specific features, such as a potted fern or a sculptural piece, and creating dramatic shadows that add visual interest.

    The contrast between light and shadow enhances the three-dimensionality of the space, making it feel more dynamic and alive.

    Plant Placement and Size

    The strategic placement of plants is paramount to achieving the desired aesthetic and maximizing their visual impact. The size and type of plant are chosen to complement the scale of the space and the surrounding elements. Larger plants, such as a fiddle-leaf fig or a snake plant, can act as focal points, drawing the eye and anchoring the design.

    Smaller plants, like succulents or air plants, can be used to fill in gaps and add texture to shelves or windowsills. The following list details the plant placement within a typical Scandinavian bathroom design:

    • A large fiddle-leaf fig ( Ficus lyrata) placed in a corner, receiving indirect sunlight from a nearby window. Its large leaves provide a significant visual impact.
    • Two smaller snake plants ( Sansevieria trifasciata) positioned on a floating shelf above the vanity, adding verticality to the design and introducing a textural contrast to the smooth surfaces.
    • A collection of assorted succulents in various small pots arranged on the windowsill, basking in the natural light. Their diverse shapes and colors add visual interest.
    • A hanging pothos ( Epipremnum aureum) cascading from a ceiling-mounted hook, softening the hard lines of the architecture and adding a touch of elegance.

    Bathroom Floor Plan

    The following floor plan illustrates the layout of a Scandinavian bathroom, highlighting the placement of plants and other key features. The dimensions are approximate and can be adjusted to suit individual needs and space constraints.

    Imagine a rectangular bathroom approximately 10ft x 8ft. The entrance is on the short wall. The shower is on the long wall to the left of the entrance, followed by a toilet. The vanity is situated on the opposite long wall, with a mirror above it. The window is positioned above the vanity on the short wall opposite the entrance.

    The plants are strategically placed as follows:

    1. Fiddle-leaf fig in the corner between the shower and the long wall opposite the entrance.
    2. Snake plants on the shelf above the vanity, centered on the wall.
    3. Succulents on the windowsill.
    4. Hanging pothos from the ceiling above the vanity, slightly offset from the center.

    Texture and Color Palette

    The color palette is predominantly light and neutral, with white or light gray walls serving as a backdrop to the rich textures and colors of the plants and other materials. The use of natural materials such as light oak wood for the vanity and shelving introduces warmth and visual interest. The matte white tiles on the floor and shower walls provide a clean and minimalist aesthetic, while the textured linen curtains add a touch of softness.

    The green hues of the plants provide a refreshing contrast against the neutral tones, injecting life and vibrancy into the space. The combination of smooth and textured surfaces, along with the varied shades of green, creates a visually appealing and cohesive design. The overall effect is one of calm, serenity, and natural beauty.

    Practical Considerations

    Successfully integrating plants into a Scandinavian bathroom, while aesthetically pleasing, requires careful consideration of the unique environmental challenges this space presents. High humidity levels, fluctuating light conditions, and limited space all impact plant health and longevity. Understanding these factors is crucial for selecting and maintaining thriving greenery.The bathroom environment, while visually appealing with its clean lines and natural light, presents a unique set of challenges for plant life.

    High humidity, often exceeding 60%, can lead to fungal diseases like root rot if not properly managed. Conversely, many bathrooms lack sufficient natural light, particularly those without windows or with limited sunlight exposure. Furthermore, the space available for plants might be limited, necessitating the selection of compact species.

    Challenges of Maintaining Plants in Bathrooms

    High humidity levels, a characteristic feature of most bathrooms, create a breeding ground for fungal pathogens. These pathogens thrive in moist conditions, attacking plant roots and stems, leading to root rot and other diseases. Symptoms often include wilting, yellowing leaves, and a general decline in plant health. Conversely, insufficient light, especially in bathrooms lacking windows or with limited sun exposure, hinders photosynthesis.

    This process, vital for plant growth, is significantly reduced under low-light conditions, resulting in weak, leggy growth and potentially plant death. Finally, limited space restricts the choice of plant species, necessitating careful selection of compact and slow-growing varieties. For instance, a large fern may not thrive in a small, windowless bathroom.

    Choosing Low-Maintenance Plants for Bathrooms

    Selecting low-maintenance plants is crucial for success in a bathroom environment. Species tolerant of low light and high humidity are ideal. Examples include the ZZ plant (Zamioculcas zamiifolia), known for its drought tolerance and ability to survive in low-light conditions; snake plants (Sansevieria trifasciata), similarly resilient to neglect and low light; and peace lilies (Spathiphyllum wallisii), which thrive in humid environments and indicate their water needs through drooping leaves.

    These plants are all relatively compact, suitable for smaller bathroom spaces. Careful consideration of the available light and humidity levels is key to selecting the most appropriate species.

    Necessary Tools and Supplies for Bathroom Plant Care

    Proper plant care necessitates the right tools and supplies. This includes a watering can with a long spout for easy access to plants in tight spaces, a small spray bottle for increasing humidity around plants if needed, and a moisture meter to monitor soil moisture levels, preventing overwatering and root rot. Potting mix specifically designed for indoor plants, providing good drainage and aeration, is also essential.

    Additionally, small pebbles or gravel can be placed at the bottom of pots to improve drainage. Finally, a cleaning solution suitable for plant leaves will help remove dust and maintain healthy foliage. Regularly checking for pests and diseases, and having appropriate treatment options readily available, will also contribute to the long-term health of your bathroom plants.

    Concluding Remarks

    Scandinavian bathroom with green plants

    Creating a Scandinavian bathroom with green plants is a journey of thoughtful design and careful execution. By understanding the principles of Scandinavian minimalism, selecting appropriate plant species, and paying attention to lighting and material choices, one can transform a bathroom into a haven of calm and vitality. The interplay of light and shadow, the texture of natural materials, and the vibrant green hues of healthy plants combine to create a space that is both aesthetically stunning and scientifically sound, improving air quality and enhancing overall well-being.

    The result is a bathroom that is not just functional, but a true reflection of a mindful and harmonious lifestyle.

    FAQ Guide

    What are the best ways to increase humidity for plants in a bathroom with poor ventilation?

    Consider using a humidifier specifically designed for bathrooms, grouping plants together to create a microclimate, or placing a tray of water near the plants to increase evaporative humidity. Regular misting can also help.

    How often should I water plants in a Scandinavian bathroom?

    Watering frequency depends on the plant species and the bathroom’s humidity levels. Check the soil moisture before watering; water thoroughly when the top inch of soil feels dry. Avoid overwatering, which can lead to root rot.

    Are there any plants to avoid in a bathroom due to potential mold issues?

    Plants that prefer very dry conditions are generally not suitable for bathrooms due to the high humidity. Choose plants that tolerate humidity well to prevent mold growth. Proper ventilation is also crucial.

    How can I prevent pests in my bathroom plants?

    Regularly inspect plants for signs of pests. Use insecticidal soap or neem oil for treatment if necessary. Maintaining good air circulation can help prevent pest infestations.

    What are some low-maintenance, air-purifying plants suitable for a Scandinavian bathroom?

    Snake plants, ZZ plants, and peace lilies are excellent choices. They tolerate low light and infrequent watering, and are known for their air-purifying qualities.